
EASY-MARK PLUS
TM
Labeling Software User Guide
Version: 11
Date: 31 January 2022
Copyright © Panduit Corporation 2022, All Rights Reserved
2
For technical support, please contact us:
Region
Telephone
E-mail
USA & Canada
1-866-871-4571
GA-TechSupport@panduit.com
Latin America
+52-33-3777-6000
TechSupportLatAm@panduit.com
Europe
+31-546-580-452
emeatoolservicecenter@panduit.com
Asia Pacific
65-6379-6700
TechSupportAP@panduit.com
Japan
81-3-6863-6060
TechSupportAP@panduit.com
Australia
613-9794-9020
TechSupportAP@panduit.com
Or visit: www.panduit.com
Please contact Panduit technical support if you believe any of the information shown here is
incorrect.
Copyright © 2022 Panduit Corporation. All Rights reserved. No part of this publication may be
reproduced, transmitted, transcribed, stored in a retrieval system, or translated into any language
or computer language in any form or by any means, electronic, mechanical, magnetic, optical,
chemical, manual, or otherwise, without the prior written permission of the Panduit Corporation,
18900 Panduit Dr, Tinley Park, IL 60487
Restricted Rights Legend
Use, duplication, or disclosure by the Government is subject to restrictions as set forth in
subparagraph ©(1)(ii) of the Rights in Technical Data and Computer Software clause at DFARS
52.277-7013.
Trademarks
Easy-Mark Plus is a registered trademark of Panduit Corporation. Windows™ is a trademark of the
Microsoft Corporation.
3
Table of Contents
1. Getting Started ......................................................................................................................... 4
1.1. Introduction ........................................................................................................................ 4
1.2. System Requirements and Installation ................................................................................ 4
1.3. Landing Page Overview ................................................................................................... 17
1.4. Ribbon Overview ............................................................................................................. 20
1.5. Creating Formats, Printer Types, and Media Types .......................................................... 26
2. Working with Files .................................................................................................................. 32
2.1. Creating New Files........................................................................................................... 32
2.2. Opening Existing Files ..................................................................................................... 34
2.3. Saving the Files ............................................................................................................... 35
2.4. Printing Files .................................................................................................................... 36
2.5. Protecting Files ................................................................................................................ 40
3. Objects Overview ................................................................................................................... 41
3.1. Inserting the Graphical Objects ........................................................................................ 41
3.2. Creating a Prompt at Print ................................................................................................ 49
3.3. Inserting the Date and Time ............................................................................................. 50
3.4. Inserting the Barcodes ..................................................................................................... 53
3.5. Working with Inserted Objects .......................................................................................... 56
4. Working with Labels ............................................................................................................... 59
4.1. Editing the Labels ............................................................................................................ 59
4.2. Customizing the Label Layout .......................................................................................... 60
4.3. Customizing the Label View ............................................................................................. 66
4.4. Using the Serialization Tool .............................................................................................. 68
4.5. Importing Data from an External Source ........................................................................... 73
4.6. Creating Templates .......................................................................................................... 76
5. Working with Fonts and Formats............................................................................................. 79
5.1. Working with Fonts .......................................................................................................... 79
5.2. Working with Formats ...................................................................................................... 82
6. Working with Wizards ............................................................................................................. 85
6.1. Wizard Overview .............................................................................................................. 85
6.2. Safety Sign Wizards ......................................................................................................... 86
7. Configuring the Application ..................................................................................................... 90
Troubleshooting ......................................................................................................................... 93
Index ......................................................................................................................................... 94

4
1. Getting Started
1.1. Introduction
Panduit® Easy-Mark Plus™ Labeling Software is innovative software that is designed to simplify
label creation for customer-specific applications, such as Network, Panel Building, and
Construction & Maintenance. This program allows you to see the labels on-screen as they will
appear when printed. You can reduce time and errors by importing data that was previously
created in Excel, (.xls) files, or comma-separated value (.csv) files onto the labels. Insert symbols
such as your company logo or .jpg, .bmp, .wmf, and .gif files onto the labels.
For easy reference about commonly used functions, see the quick start card that is located inside
the CD case.
Available Easy-Mark Plus™ Versions
Easy-Mark Plus™ is available in several different form factors. Easy-Mark Plus™ is available on
CD, a portable USB flash memory drive, a web-downloadable version and a version intended for
installation on a network.
1.2. System Requirements and Installation
To install and use the Easy-Mark Plus application, the following hardware and software
requirements should be fulfilled:
Component
Portable
Standalone
Network Client
Network Server
OS
Vista SP1/7/8/8.1/10 x32/x64
Windows Server 2003 SP2/2008/2008 R2/
2012/2012 R2, 2016, 2019
Windows 7 SP1/8/8.1/10 x32/x64
Windows Server 2008 SP2/2008
R2/2012/2012 R2, 2016, 2019
Memory
2 GB
2 GB
2 GB
3 GB
Disk Space
300MB
300MB
150MB
1GB
SQL Server
(if installed
separately)
-
-
-
SQL Server 2005 SP3/2008/2008
R2/2012/2014 x32/x64
Easy-Mark Plus™ Components
The Easy-Mark Plus™ application is based on the .NET Framework 4.0 technology. During the
installation, the installer performs the following actions:
• installs .NET Framework 4.0 if it is not already installed
• installs the Panduit fonts if they are not already installed
• adds necessary registry keys and values for CAD-Connect integration
• for Network Server installation, installs MS SQL Server 2014 SP2 x86 Express Edition
• for Network Client installation, installs patch KB2580188
• for the non-portable version, associates the Easy-Mark Plus documents with the application
• for the non-portable version, creates desktop shortcuts of the application
5
Easy-Mark Plus™ Portable Installation (USB Flash Drive)
To install the Easy-Mark Plus™ Portable version, perform the following steps:
1. Insert the flash drive into any available USB port on the PC.
2. If autorun features are enabled on your system, the installation will begin automatically.
3. If autorun is not enabled, open the folder for the flash drive and double-click the Launch.exe
file to start the Easy-Mark Plus™ installer.
4. On the languages screen, click the required language to start the application.
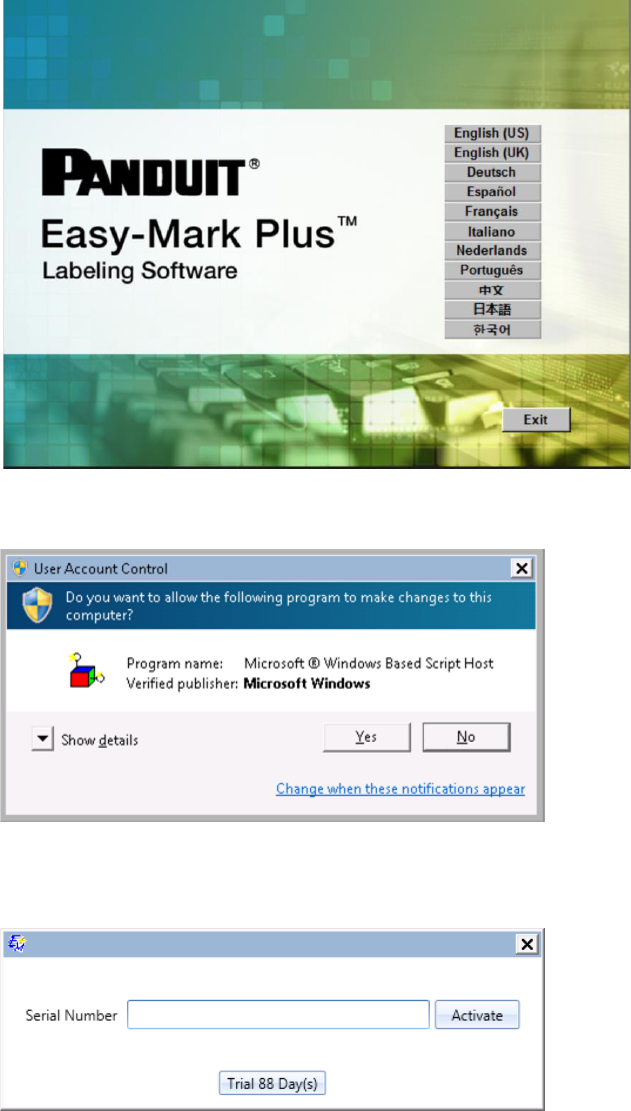
5. In the User Account Control dialog, click Yes. The prerequisites will be installed.
6. In the licenses window, either enter the serial number and click Activate, or click Trial. The
serial number is located on a label in the package insert.
6
Easy-Mark Plus™ Standalone Installation (CD Version and Web Download Version)
To install Easy-Mark Plus™ from a CD, perform the following steps:
1. Insert the CD into the disc drive.
2. If autorun features are enabled on your system, the installation will start automatically.
3. If autorun is not enabled, open the folder on the CD and double-click on the program
Launch.exe to start the Easy-Mark Plus™ installer.
To install Easy-Mark Plus™ from a downloaded file, perform the following steps:
1. Navigate to the folder or location where you placed the file.
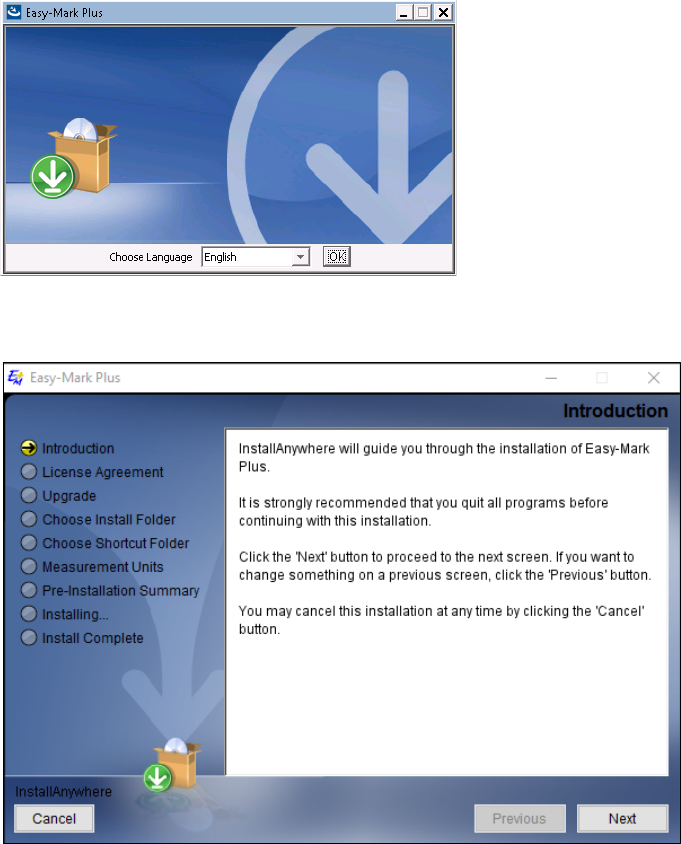
2. Double-click the EasyMarkPlus_setup.exe file to start the Easy-Mark Plus™ installer.
3. On the languages screen, select the required language and click OK to continue the setup.
4. On the Introduction screen, click Next to continue the setup.
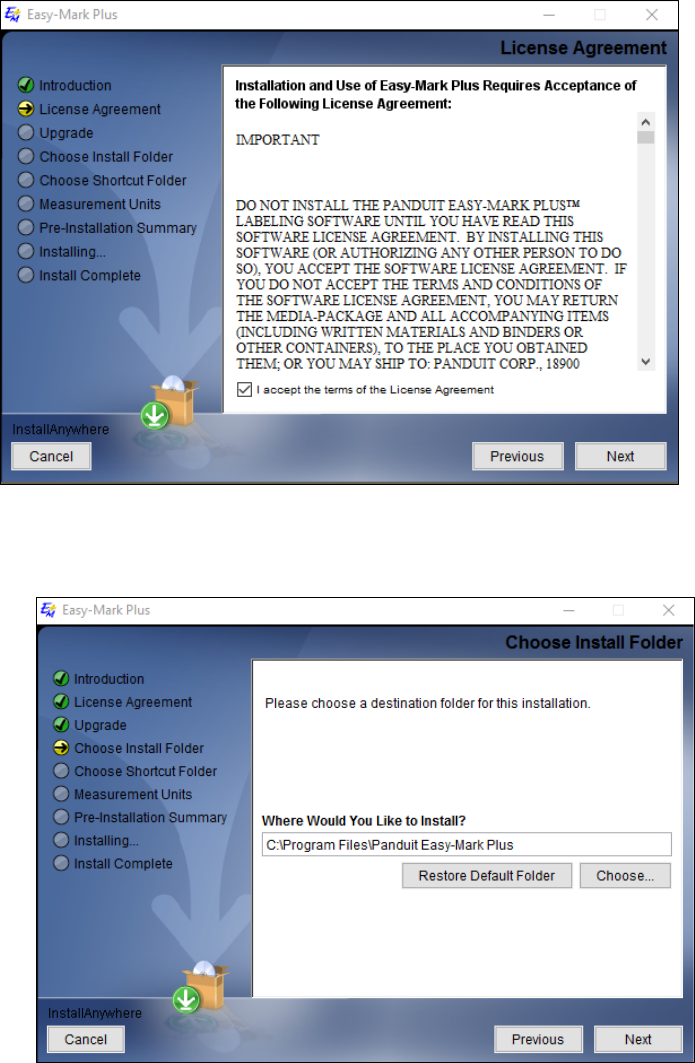
5. On the License Agreement screen read License Agreement, check the checkbox if you
agree and click Next
7
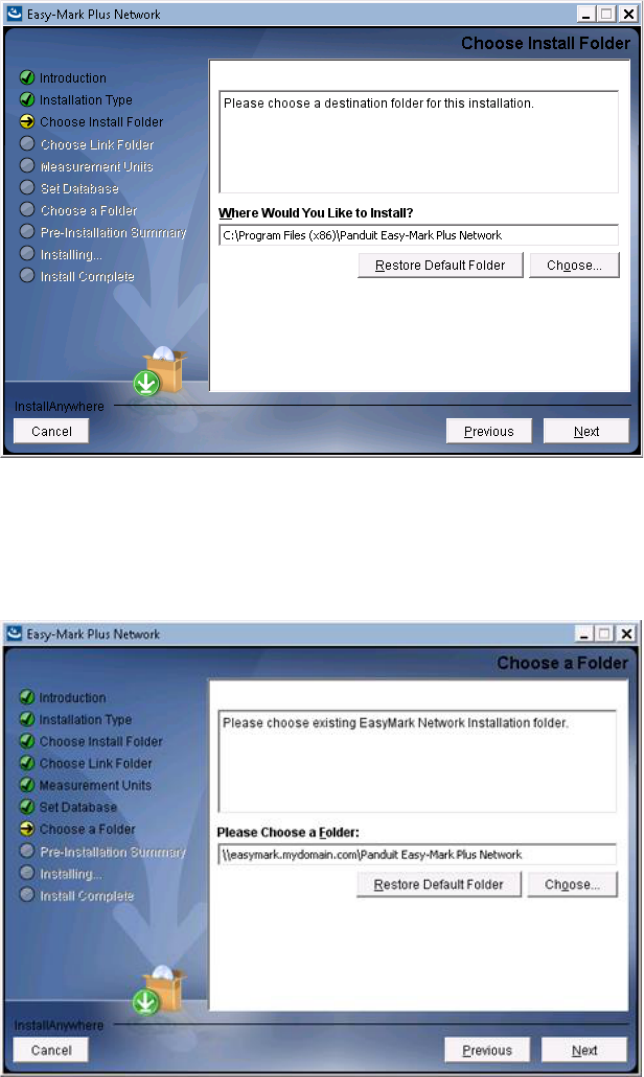
6. On the Choose Install Folder screen, either select a destination folder for your installation
or restore a default folder, and then click Next to continue the setup.
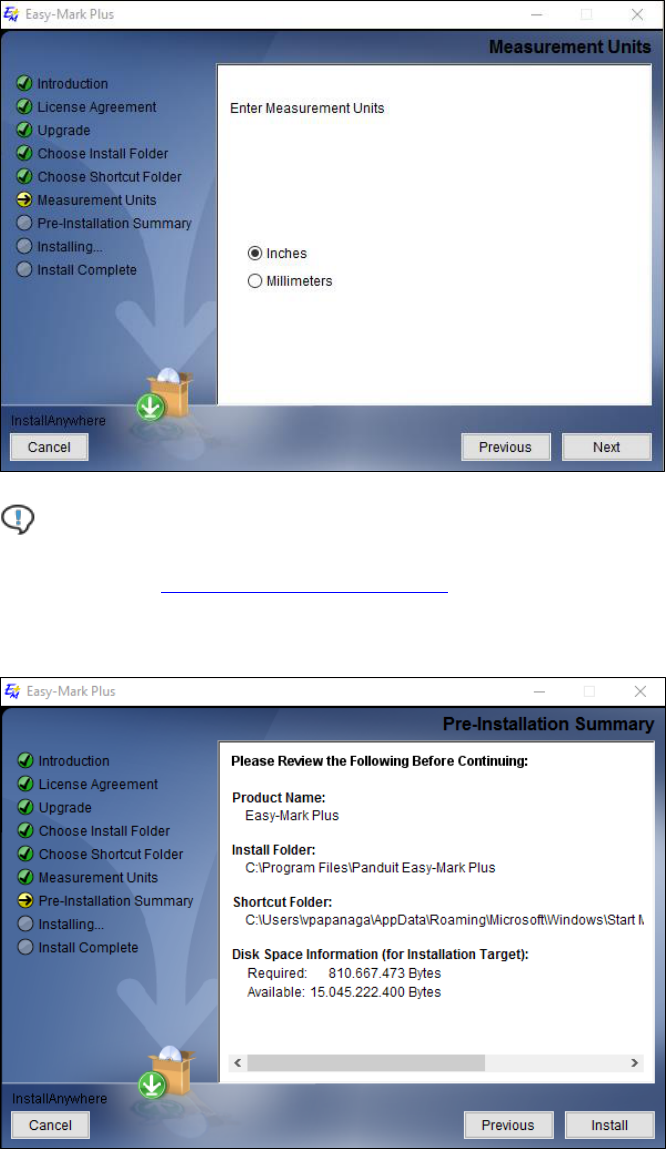
7. On the Measurement Units screen, select the measurement unit that you would like to use
in Easy-Mark Plus™, and then click Next to continue the setup.
8
Note: This screen will be shown only if the English language was selected. You can
change the measurement unit on the Locale tab of the Options window. For more
information, see 7. Configuring the Application.
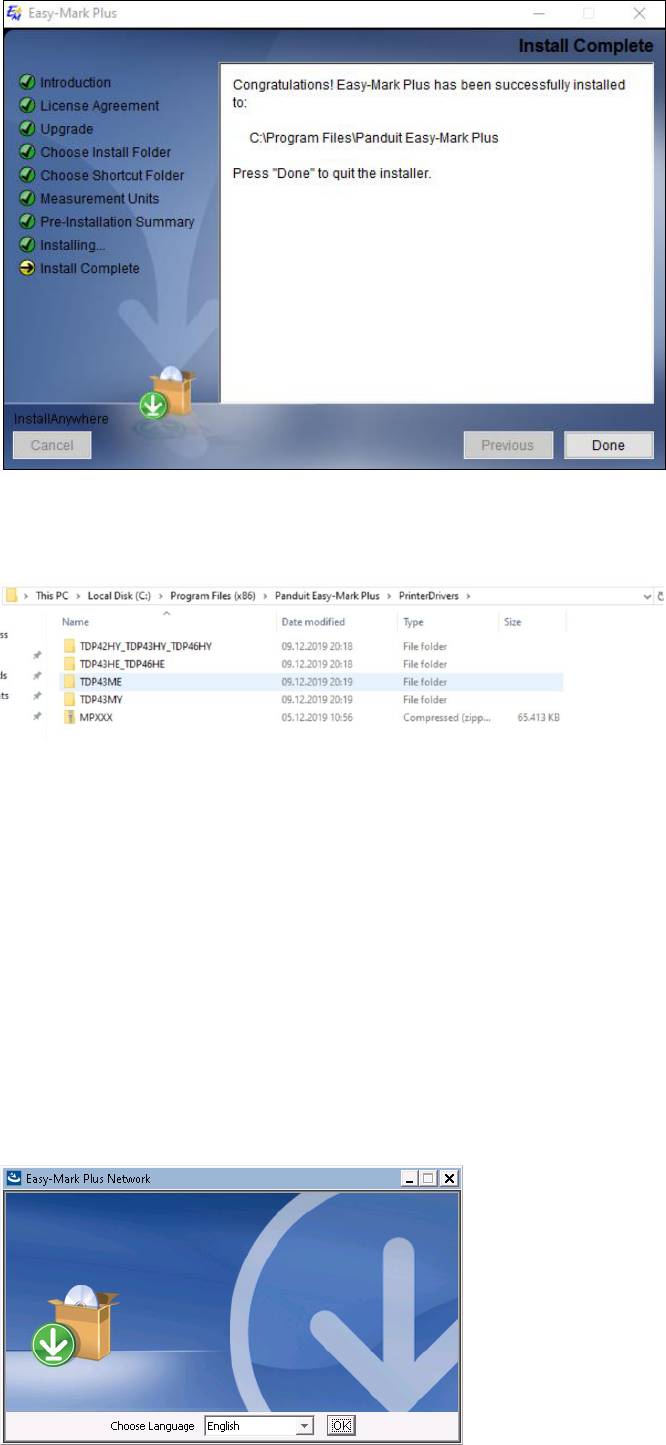
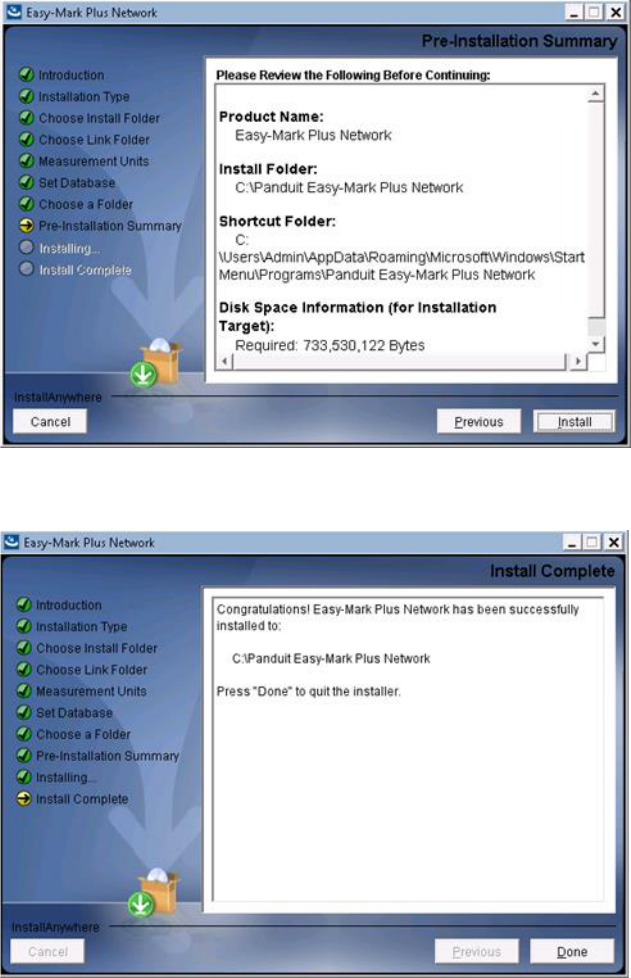
8. Review the pre-installation summary, and then click Install.
9. When the installation is complete, click Done.
9
10. After application was installed you can go to Application Folder and install manually Printer
drivers.
Easy-Mark Plus™ Network Installation (Panduit Part Number EMPLUS-SERVER)
Easy-Mark Plus™ Network Version must be installed by an advanced user with proper system
privileges. It is recommended that this installation be done by qualified IT personnel. The
installation consists of two parts: Part 1 for the network server installation and Part 2 for the client
installation.
Part 1: Network Server Installation
To install the Easy-Mark Plus™ Network Server, perform the following steps:
1. Insert the CD into the disc drive.
2. Start the Easy-Mark Plus™ installer (EasyMarkPlus_setup.exe).
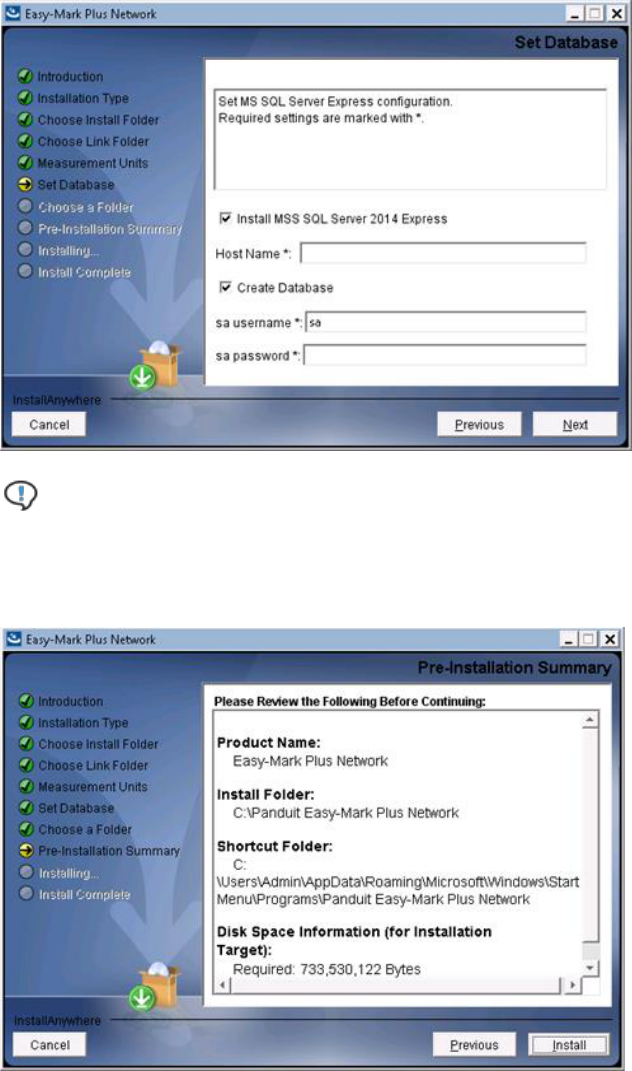
3. On the languages screen, select the required language and click OK to continue the setup.
10
4. On the Introduction screen, click Next to continue the setup.
5. On the Installation Type screen, select Network Server Install, and then click Next to
continue the setup.
6. On the Choose Install Folder screen, either select a destination folder for your installation
or restore a default folder, and then click Next to continue the setup.

11
7. On the Choose Link Folder screen, select the place where you would like to create the
Easy-Mark Plus™ icons. Specify whether you want to create icons for all Easy-Mark Plus™
users, and then click Next to continue the setup.
8. On the Measurement Units screen, select the measurement unit that you would like to use
in Easy-Mark Plus™, and then click Next to continue the setup.
Note: This screen will be shown only if the English language was selected. You can
change the measurement unit on the Locale tab of the Options window. For more
information, see 7. Configuring the Application.
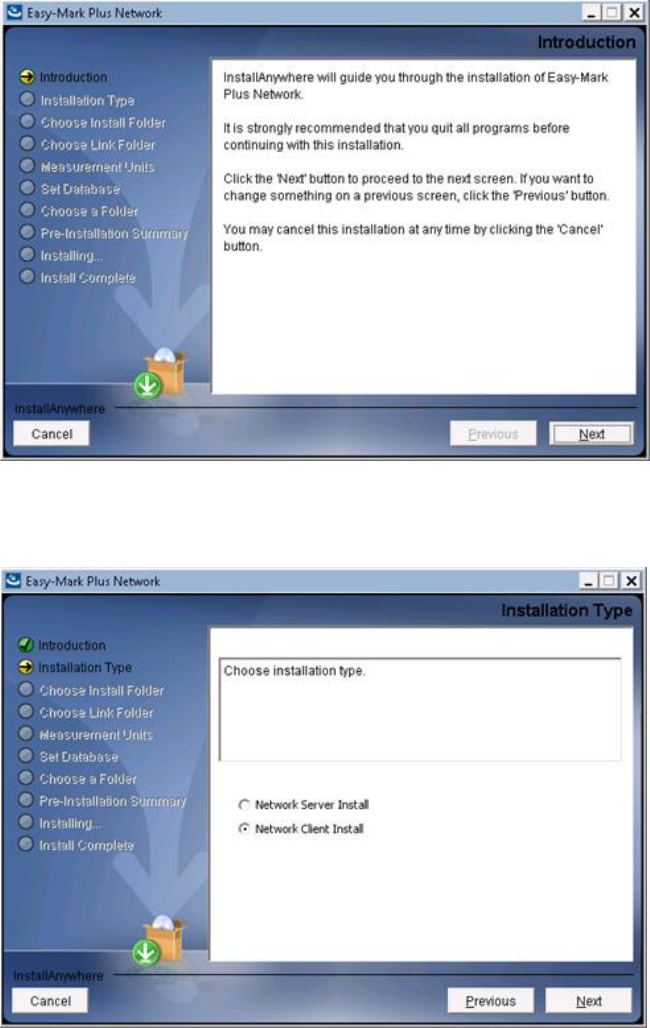
9. On the Set Database screen, set the required values and click Next to continue the setup.
12
Note: If using an existing instance of the SQL Server with a non-default port (1433), the
field Host Name may be set as hostname, port
10. Review the pre-installation summary, and then click Install.
11. When the installation is complete, click Done.

13
12. Share the folder with installed Easy-Mark Plus™ Network Server files (e.g. C:\Panduit
Easy-Mark Plus Network) to required users.
Part 2: Network Client Installation
Before you install the Easy-Mark Plus™ Network Client, please make sure that the administrator
has provided you with the path to the shared Easy-Mark Plus™ Network Server files, and that the
path is accessible. Besides, make sure that the network server installation for Easy-Mark Plus™
has been completed.
To install the Easy-Mark Plus™ Client Server, perform the following steps:
1. Start the Easy-Mark Plus™ installer (EasyMarkPlus_setup.exe).
2. On the languages screen, select the required language and click OK to continue the setup.
3. On the Introduction screen, click Next to continue the setup.
14
4. On the Installation Type screen, select Network Client Install, and then click Next to
continue the setup.
5. On the Choose Install Folder screen, either select a destination folder for your installation
or restore a default folder, and then click Next to continue the setup.
15
6. On the Choose a Folder screen, select the path to the Easy-Mark Plus Network Server
files share. Click Next to continue the setup.
16
7. Review the pre-installation summary, and then click Install.
8. When the installation is complete, click Done.
Easy-Mark Plus™ Unattended Installation (Advanced Network Installer Option)
This option is available for system administrators or IT personnel that are familiar with installing
software by using the following methods. It is not intended for standard users of Easy-Mark Plus™.
To perform unattended installation, you need a response file. It is a text file with the name value
pairs that represent certain installer variables. It may be obtained after running the installer in the
GUI or console mode with the –r <file properties> argument.
Open a CLI terminal window and execute the following:
EasyMarkPlus_setup.exe -i silent -f installer.properties -l en
or
17
EasyMarkPlusNetwork_setup.exe -i silent -f installer.properties -l en
Variables values may be specified as arguments, i.e., to perform Easy-Mark Plus™ Network Client
unattended installation to the default install folder, execute the following:
EasyMarkPlusNetwork_setup.exe -i silent -l en -
DNetwork_Folder=”\\\\serverName\\Panduit Easy-Mark Plus Network”
1.3. Landing Page Overview
After you launch Easy-Mark Plus™ Labeling Software, a Landing Page appears. From this page,
you can create a new project (label file) or document on the basis of a preferred format or
template. From here you can also configure Easy-Mark Plus™
.
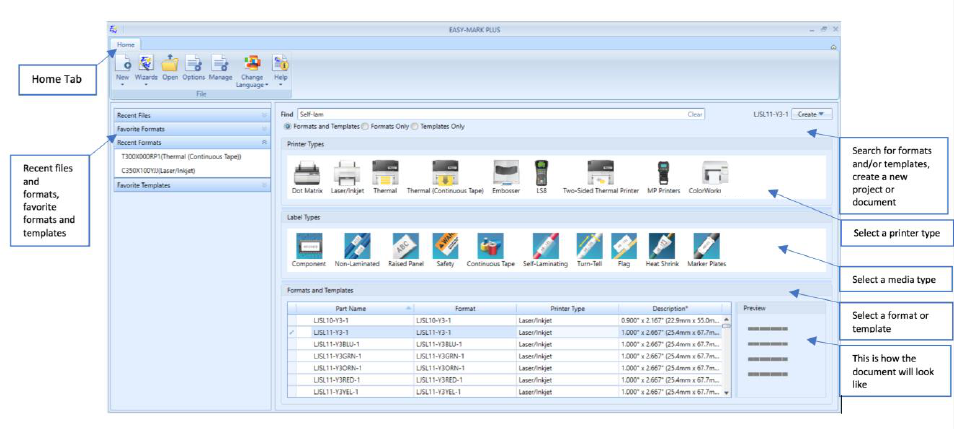
The Landing Page gives access to the following functionality:
• Home tab > New: Click this button to create a new project or document. For more
information, see 2.1. Creating New Files.
• Home tab > Wizards: Click this button to create a new project or a new document by using
the Easy-Mark Plus™ wizards. For more information, see 6. Working with Wizards.
• Home tab > Open: Click this button to open one of the existing projects. For more
information, see 2.2. Opening Existing Files.
• Home tab > Options: Click this button to open the Options window where you can
configure Easy-Mark Plus™. For more information, see 7. Configuring the Application.
• Home tab > Manage: Click this button to open the Settings window where you can create
and edit your own custom formats, printer types, and media types. For more information,
see 1.5. Creating Formats, Printer Types, and Media Types.

18
• Home tab > Change Language: Click this button to change the user interface localization
of Easy-Mark Plus™.
Note: You can expand and collapse the Home tab of the Landing Page by clicking the
arrow in the upper-right corner.
• Recent Files: Expand this drop-down to view a list of files that you have recently created.
• Favorite Formats: Expand this drop-down to view a list of formats that you use most
frequently.
• Recent Formats: Expand this drop-down to view a list of formats that you have recently
used.
• Favorite Templates: Expand this drop-down to view a list of templates that you use most
frequently.
• Find: Enter your search criteria in this search box to look for a specific format or template. If
you know the name of the format or template, you can enter the name or its part. As a
result, the Formats and Templates list at the bottom of the page will be filled with formats
the names of which contain the entered text. You can also filter the search results list for a
specific printer or media type by selecting the icon of this printer or media type. The
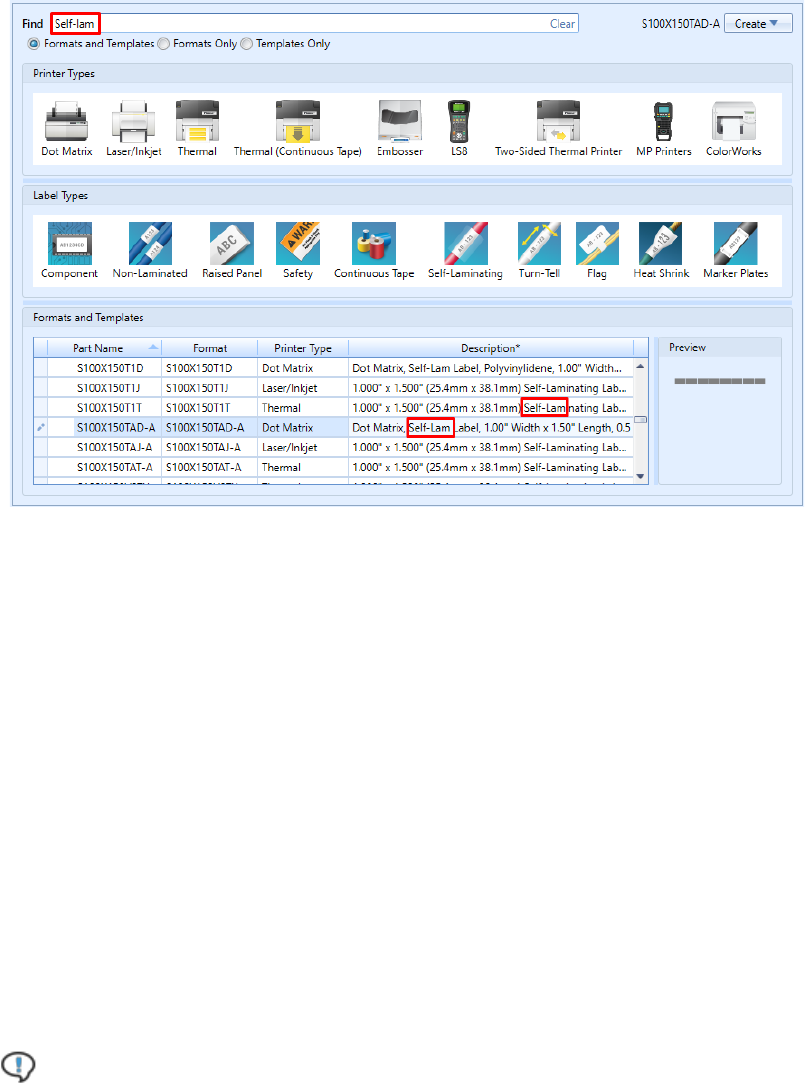
screenshot below shows an example of searching for "S100X150" term for a Dot Matrix
printer.
19
If you know only the description of a format, for example, if you are searching for a self-
laminating label format, you can enter "self-lam" in the search field. This action will display
all formats and/or templates that have "self-lam" in their description.
The radio buttons below will help you to filter your search results in the following way:
o Formats and Templates: Search for both formats and templates.
o Formats Only: Search only for formats.
o Templates Only: Search only for templates.
• Create: This button is active only when you select a format from the list at the lower part of
the Landing Page. Click this button to create either a project or a document on the basis of
the predefined format.
• Printer Types: Click the icon of the preferred printer type to filter the Formats and
Templates list by printer type.
• Media Types: Click the icon of the preferred media type to filter the Formats and
Templates list by media type.
Note: You can also select both the printer type and media type icons to filter the
Formats and Templates list by both printers and media types that are suitable for these
printers.
20
• Formats and Templates: In this list, select the name of the preferred format on the basis
of which you want to create a new project or document. On the right you can see the
preview of the selected format or wizard.
• View: Click this button to view the format-related entries either as a simple list of names or
as a list with details, such as printer type and description.
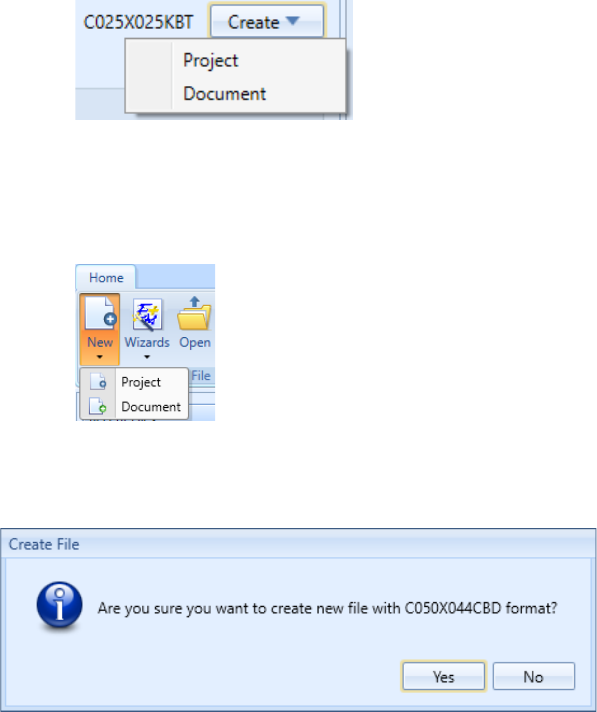
When you are ready with format selection:
1. In the upper-right corner of the Landing Page, click Create > Project to create a new
project or Create > Document to add a document to the current project.
2. In the upper-left corner of the Landing Page, click New > Project to create a new project or
New > Document to add a document to the current project.
You can also just double-click the selected format. Finally, click Yes in the confirmation dialog.
1.4. Ribbon Overview
When you work with labels in Easy-Mark Plus™, you access all available functionality via the
Ribbon, which is divided into the following tabs: File, Home, Insert, Edit, View, Layout, Font, and
Formats.
The ribbon is located in the toolbar area above the label editing section of the screen. This toolbar
ribbon is arranged with a similar design to common office productivity software.
21
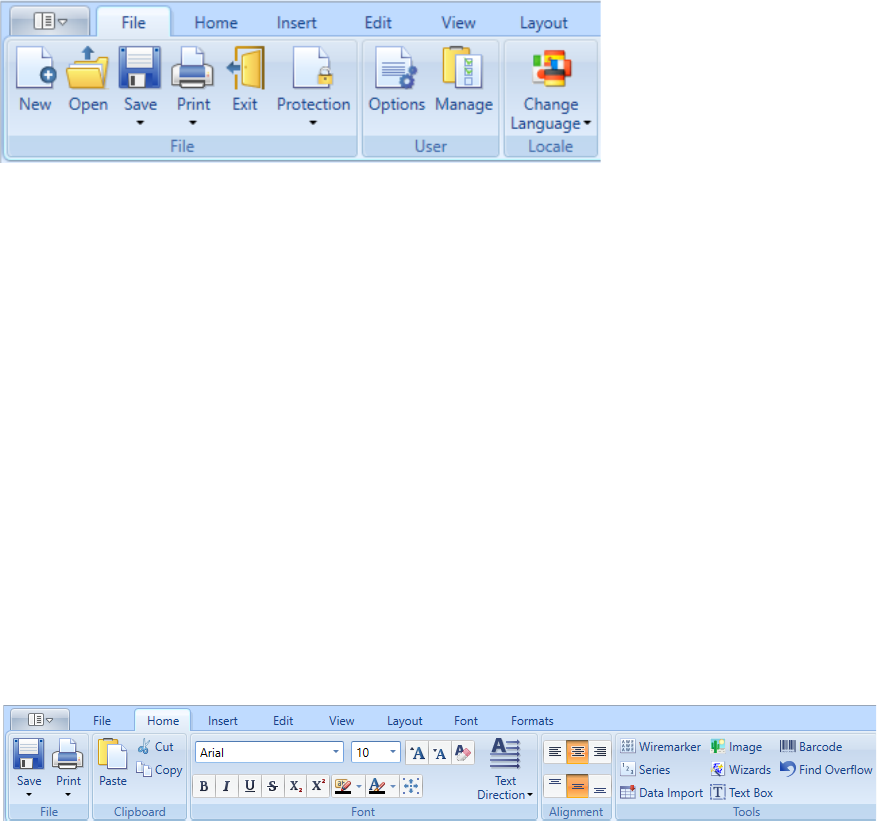
File Tab
The File tab is divided into the following sections:
• File. From this section, you can create new files, open the existing files, save the files, and
print the files. Also, in this section you can create a password to protect the label file from
unauthorized access. Finally, you can exit the application from the File section. For more
information, see 2. Working with Files.
• User. From this section, you can configure the Easy-Mark Plus™ application as well as
manage the available formats, printer types, and media types.
• Locale. In this section you can change the user interface language of Easy-Mark Plus™.
After you change the language, you should close and restart Easy-Mark Plus™ to apply the
new language configuration.
Home Tab
The Home tab is divided into the following sections:
• File. In this section you can save and print files. For more information, see 2. Working with
Files.
• Clipboard. This section gives access to the standard cut, copy, and paste options.
• Font. This section gives access to the standard font editing options. Here you can also
activate the Autosize option to fit the label content to the label's width and height. For more
information, see 5.1. Working with Fonts.
• Alignment. This section gives access to the content alignment options.
• Tools. This section gives access to the following Easy-Mark Plus™ tools:
o Wiremarker. When labeling wires, an often-used technique is to repeat or "stack"
data several times on a label so that the information can be seen easily after the
label is wrapped around the wire. Wiremarker automates this task for you.
22
o Series. Generate an alphanumeric or numeric sequence of any length and step and
place it evenly on your labels. For more information, see 4.4. Using the Serialization
Tool.
o Data Import. Import data to Easy-Mark Plus™ from external sources. For more
information, see 4.5. Importing Data from an External Source.
o Image. Add images to your labels. For more information, see 3.1. Inserting the
Graphical Objects.
o Wizards. Select and configure one of the predefined label formats. For more
information, see 6. Working with Wizards.
o Text Box. Add text boxes to your labels. For more information, see 3.1. Inserting
the Graphical Objects.
o Barcode. Add barcodes to your labels. For more information, see 3.4. Inserting the
Barcodes.
o Find Overflow: Detect labels with overflow, i.e. with non-wrapped text or image that
goes beyond the label borders.
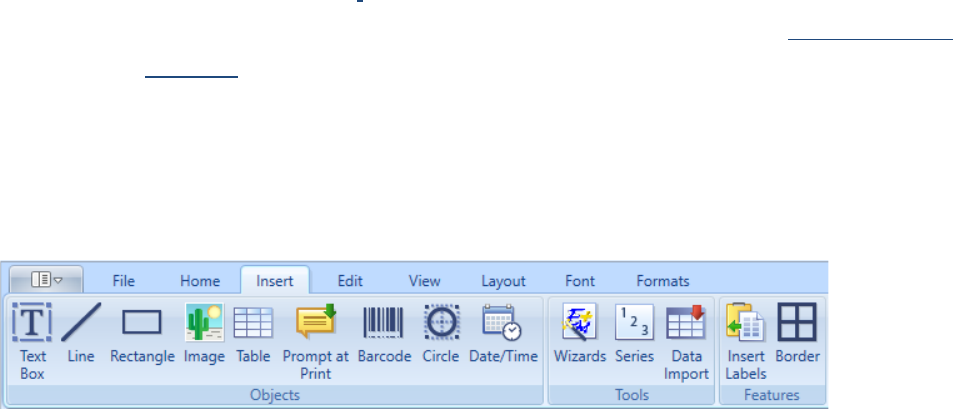
Insert Tab
The Insert tab is divided into the following sections:
Objects. From this section you can add various objects to your labels. For more
information, see

23
• 3. Objects Overview.
• Tools. This section gives access to the following Easy-Mark Plus™ tools:
o Wizards. Select and configure one of the predefined label formats. For more
information, see 6. Working with Wizards.
o Series. Generate an alphanumeric or numeric sequence of any length and step and
place it evenly on your labels. For more information, see 4.4. Using the Serialization
Tool.
o Data Import. Import data to Easy-Mark Plus™ from external sources. For more
information, see 4.5. Importing Data from an External Source.
• Features. From this section, you can insert a predefined number of blank labels before or
after the selected label, and decorate your labels with borders.
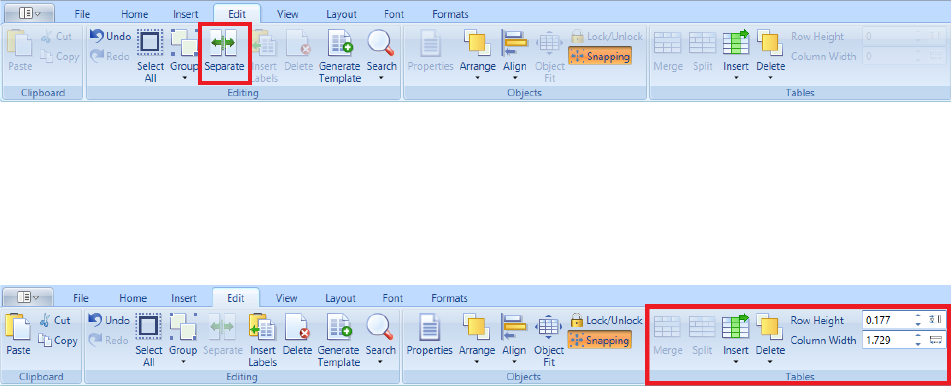
Edit Tab
The Edit tab is divided into the following sections:
• Clipboard. This section gives access to the standard cut, copy, and paste functionality.
• Editing. This section gives access to the following label editing functionality:
o Undo/Redo. Undo or redo your last action (equal to the Ctrl+Z and Ctrl+Y
keyboard shortcuts).
o Select All. Select either all labels on the current page or the entire content of the
current label.
o Group. Select several labels while holding Ctrl or Shift, and then click Group to
synchronize the content changes of these labels. You can also cancel or change the
group behavior by clicking Ungroup or Regroup, accordingly.
o Separate. Convert Series and Data Import objects to plain text.
o Insert Labels. Insert a predefined number of blank labels before or after the
selected label.
o Generate Template: Create a template based on the selected label.
o Delete. Remove either the entire label or its content.
o Search. Find or replace specific content.
• Objects. This section becomes active when you select a specific object that was previously
inserted onto your label. From this section, you can view the properties window for the

24
selected object, arrange or align the objects, organize one object as related to another
object, and lock the object from editing.
• Tables. This section becomes active when you select a specific table that was previously
inserted onto your label. This section gives access to the standard table editing options,
such as merging or splitting the table cells, inserting or deleting the table rows and
columns, and customizing the row and column size.
For more information, see 4.1. Editing the Labels.
25
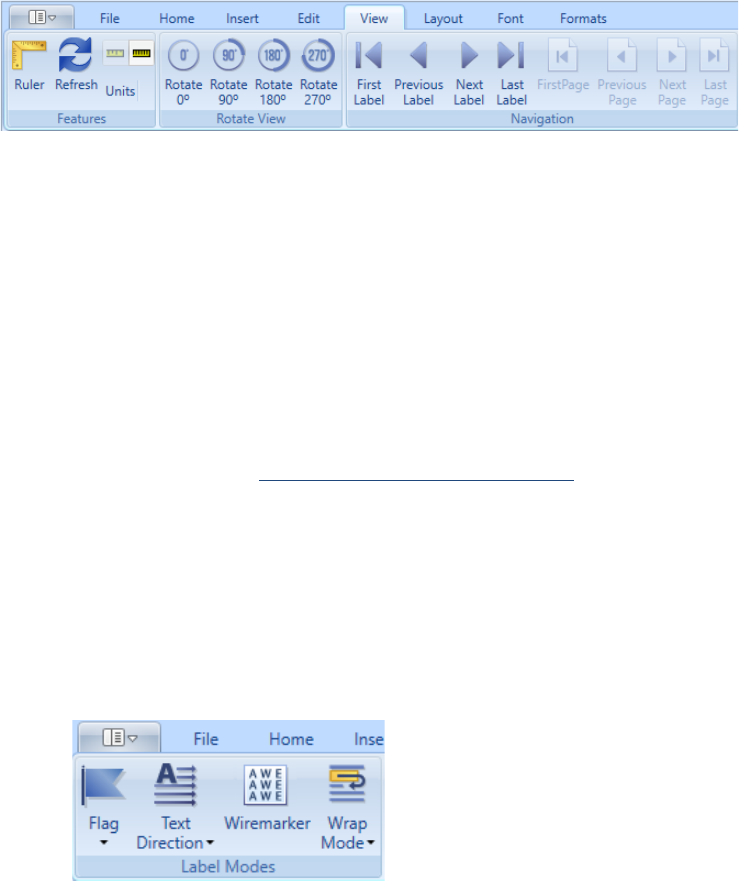
View Tab
The View tab is divided into the following sections:
• Features. In this section, you can specify whether to show the ruler in the work area and
select the preferred measurement unit (inches or millimeters).
• Rotate View. In this section, you can rotate the view of your labels by selecting the
preferred rotation angle.
• Navigation. From this section, you can navigate between your labels and label pages.
For more information, see 4.3. Customizing the Label View.
Layout Tab
The Layout tab is divided into the following sections:
• Label Modes. This section gives access to the following label modes:
o Flag. Apply one of the predefined label arrangements.
o Text Direction. Select one of the text rotation options.
o Wiremarker. When labeling wires, an often-used technique is to repeat or "stack"
data several times on a label so that the information can be seen easily after the
label is wrapped around the wire. Wiremarker automates this task for you.
o Wrap Mode. Select whether to wrap the label text by characters or by words, or
deactivate the text wrapping.
• Continuous Formats. In this section, you can define the preferred label length for
continuous label formats and set this length to dynamically change as you type the text or
insert some other content.
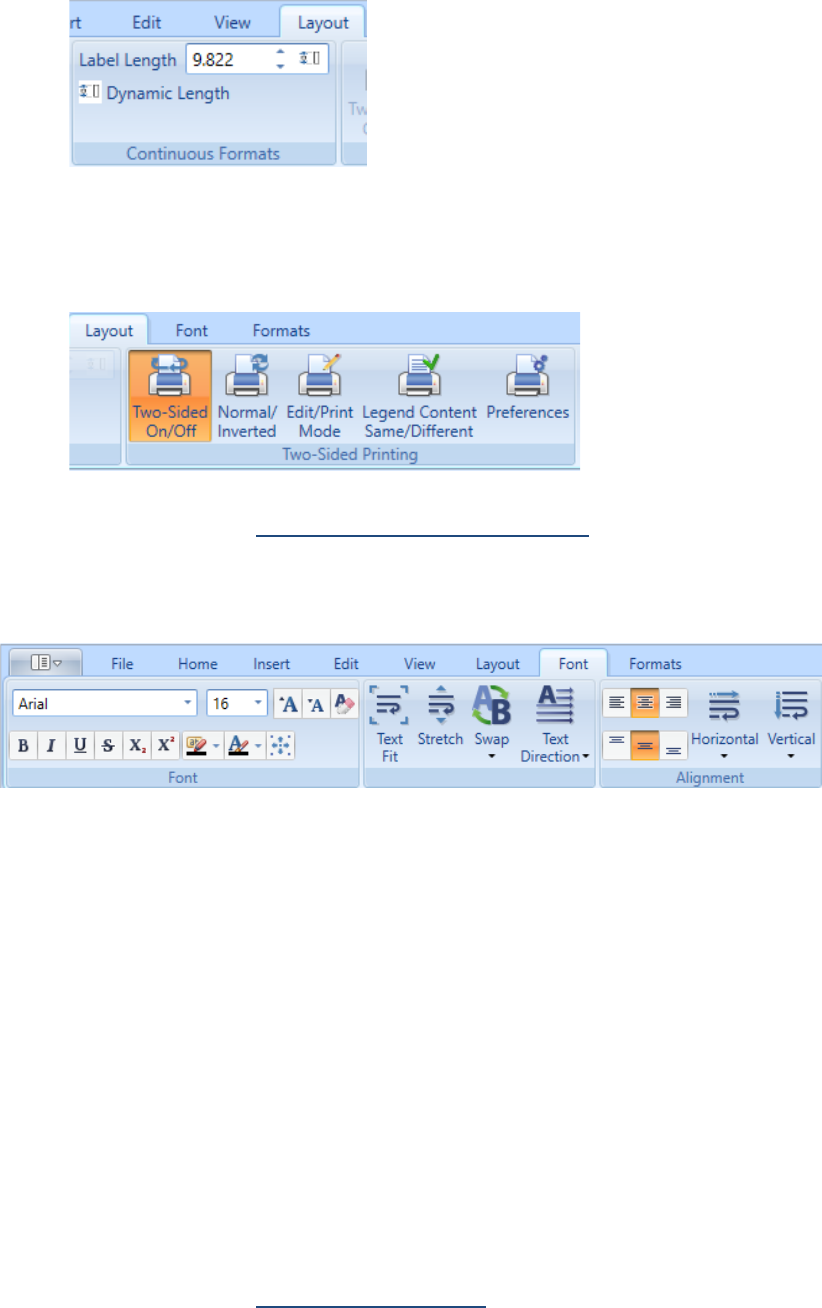
26
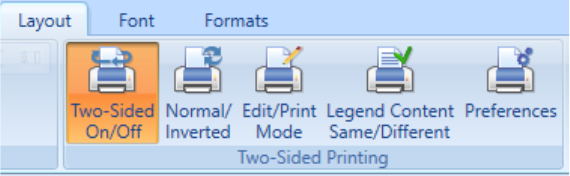
• Two-Sided Printing. This section gives access to the options that are related to two-sided
printing.
For more information, see 4.2. Customizing the Label Layout.
Font Tab
The Font tab is divided into the following sections:
• Font. This section gives access to the standard font editing options. Here you can also
activate the Autosize option to fit the label content to the label's width and height.
• Text Fit/Stretch/Swap. In this section, you can:
o adjust the content of the selected labels to optimally fill the available label area,
o stretch the selected labels vertically to fill as much label area as possible,
o reverse the order of delimited text strings or paragraphs either within a single label
or on a new label.
• Alignment. This section gives access to the standard content alignment options.
For more information, see 5.1. Working with Fonts.
27
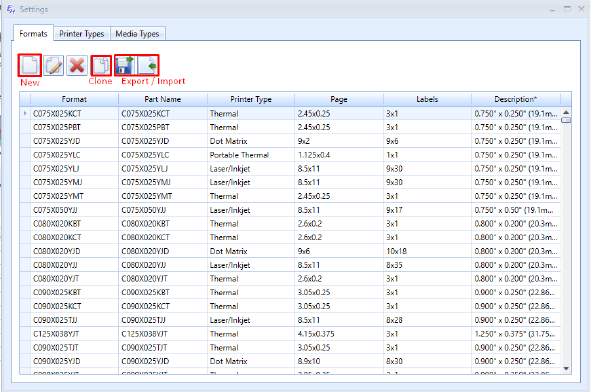
Formats Tab
The Formats tab is divided into the following sections:
• Document Formatting. This section gives access to the following document formatting
functionality:
o Switch Format. Open the format selection window to choose another format for
your current document.
o Document Properties. View and change the properties of the current document.
o Apply Template. Choose a predefined template for your document.
o Print Offset. Specify the print offset parameters.
o Label Margins. Specify the size of margins for your labels. These are the distances
from the top and bottom and left and right of the label.
o Check for Format Updates. Look up the new available label formats.
• Favorites. In this section, you can quickly create new documents on the basis of your
favorite formats or templates, and add more formats to the favorites list.
For more information, see 5.2. Working with Formats.
1.5. Creating Formats, Printer Types, and Media Types
In addition to standard label formats, printer types, and media types that are provided by Easy-
Mark Plus™, you can create and edit your own custom formats, printer types, and media types in
the Settings window. You can access this window either from the Landing Page by clicking
Manage, or from the File tab on the Ribbon by clicking Manage in the User section.
To Create a Format:
1. Open the Settings window.
2. On the toolbar of the Formats tab, do one of the following actions:
o Click the New icon to create a format from scratch.
o Select one of the existing formats and click the Clone icon to create a new format
on the basis of the existing format.
28
When you are going to create a new format either from scratch or by cloning (cloning creates a
copy from an existing format), a New Format window appears. This window has three tabs:
Format, Decoration, and Advanced.
1. On the Format tab, associate your new format with a specific type of printer and/or media.
Select the preferred printer type and/or media type from the corresponding lists.
2. Type the name and the part name of the new format. The name length should not exceed
25 characters.
3. Specify the layout for your format. The layout is a number of columns and rows that
determine how many labels will fit on a page. Enter the number of columns, which is the
number of labels across the page, and then enter the number of rows, which is the number
of labels down the page.
4. Select the preferred measurement unit for your format, either inches or millimeters. Your
choice here affects your entries for the dimensions and margin sizes. Easy-Mark Plus™
automatically converts inches into millimeters and vice versa, depending on your choice.
5. Set the width and height dimensions for page, labels, repeat (the number of times the label
will be repeated on the page based on the dimensions that you entered), and corner radius
(not greater than ½ label height). Select the Size label height to content checkbox if you
want to automatically adjust the label height to its content.
6. Set the margin sizes (top, left, bottom, right, and gap). The margin sizes are for the page
dimensions that were set by the user. These are the distances from the top and bottom and
left and right of the page.
7. In the Cut Type section, choose either Die (separated labels and rounded corners) or Butt
(the labels border on each other).

29
8. Select the Dynamic Length checkbox if you want the label size to change dynamically as
you type, and add description to your format.
9. On the Decoration tab, set up the fonts for your label, i.e. font family, size, color,
background color, and style. In the Label And Page section, set up the following
parameters:
o Label/Paper Background Color: Label and paper color are used for screen display
only. When printed, it is assumed that the label sheets that are fed into the printer
have the color that is designated on the format.
o Autosize Content. Select this checkbox to automatically fit the label content to the
label's width and height.
o Label Border. Select this checkbox if you want your labels to have borders.
o Wrapping Behavior: Select whether to wrap the label text by characters or by
words, or deactivate the text wrapping.
o Flag: If needed, apply one of the predefined label arrangements.
o Watermark: If needed, choose a watermark for your labels. This is an image that
represents the visual portions of the label outside of the editable area.
o Wire Mode: Select this checkbox to turn on the Wiremarker tool. When labeling
wires, an often-used technique is to repeat or "stack" data several times on a label
so that the information can be seen easily after the label is wrapped around the
wire. Wiremarker automates this task for you.
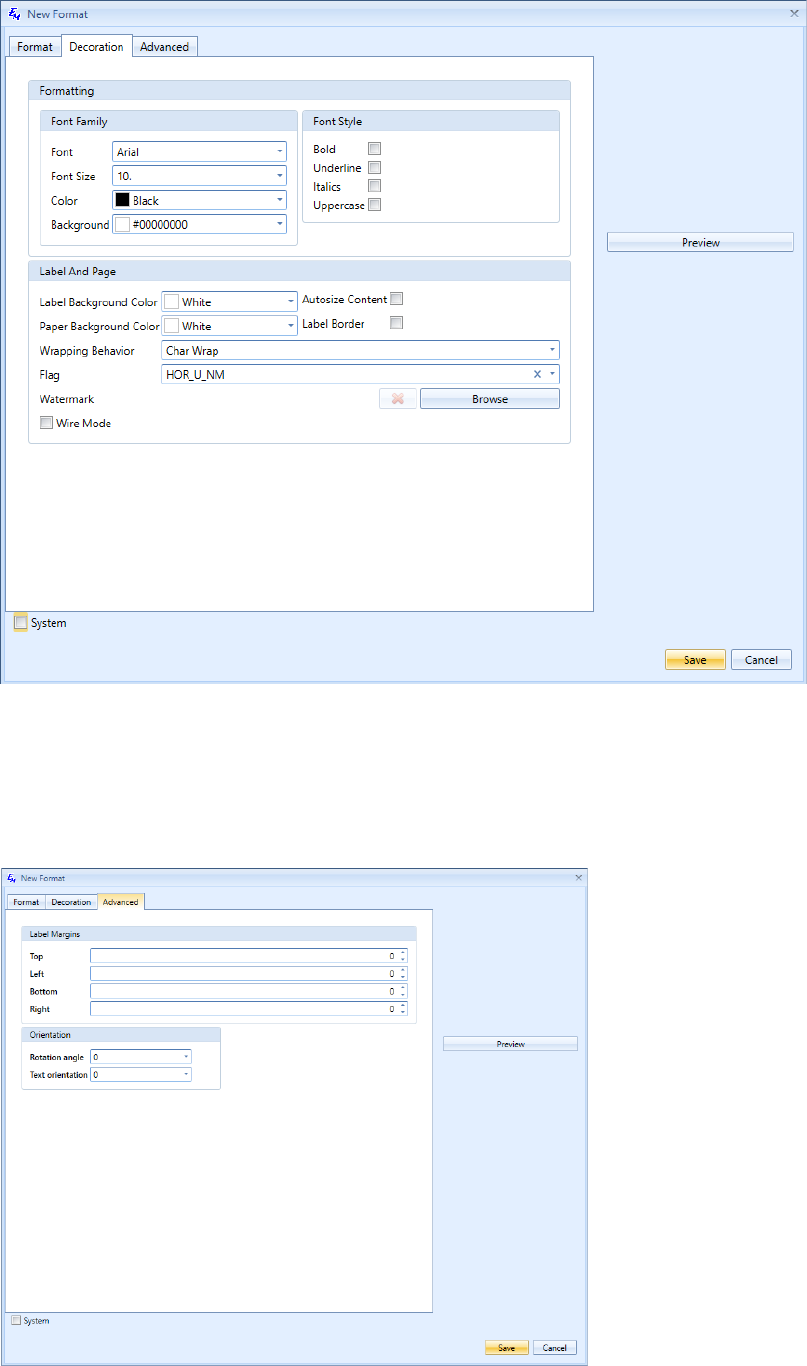
30
10. On the Advanced tab, specify the size of margins for your labels. These are the distances
from the top and bottom and left and right of the label. Finally, set up the rotation of your
labels and their content by selecting the preferred rotation angle and text orientation angle.
31
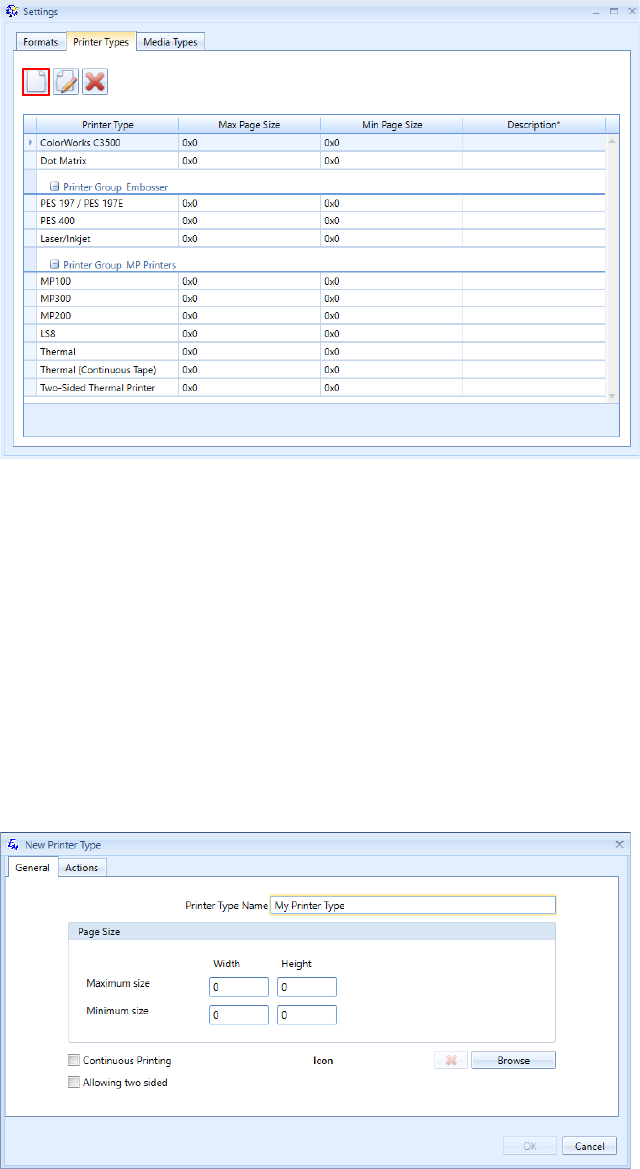
To Create a Printer Type:
1. Open the Settings window.
2. Go to the Printer Types tab.
3. On the toolbar of the Printer Types tab, click the New icon.
4. The New Printer Type window appears. This window has two tabs: General and Actions.
5. On the General tab, enter the name of your printer type, specify the width and height
dimensions for the minimum and maximum size of the pages for this printer type, and
choose the icon for the printer type.
6. Select the Continuous Printing checkbox if the new printer type allows continuous
printing, i.e. printing on continuous paper from large uncut reels.
7. Select the Allowing two sided checkbox if the new printer type allows printing on both
sides of paper.
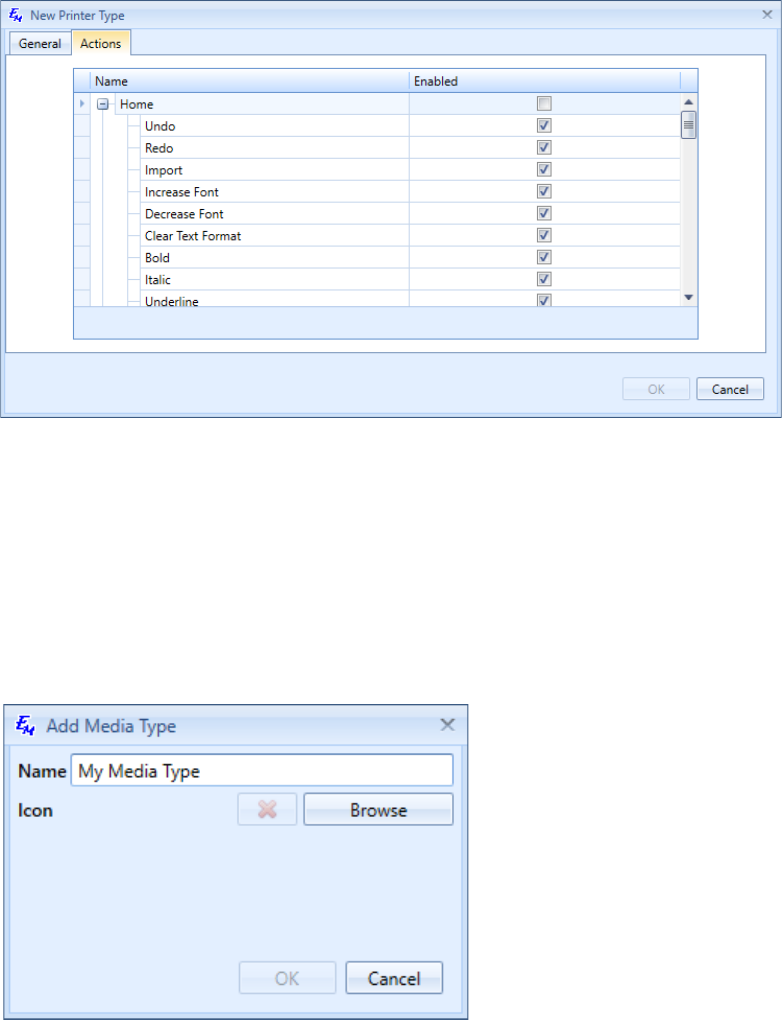
8. On the Actions tab, select the ribbon options that are available for your printer type.
32
To Create a Media Type:
1. Open the Settings window.
2. Go to the Media Types tab.
3. On the toolbar of the Media Types tab, click the New icon to open the Add Media Type
window.
4. In the Name field, type the name of the new media type.
5. Click Browse to choose the icon for the new media type.
33
2. Working with Files
2.1. Creating New Files
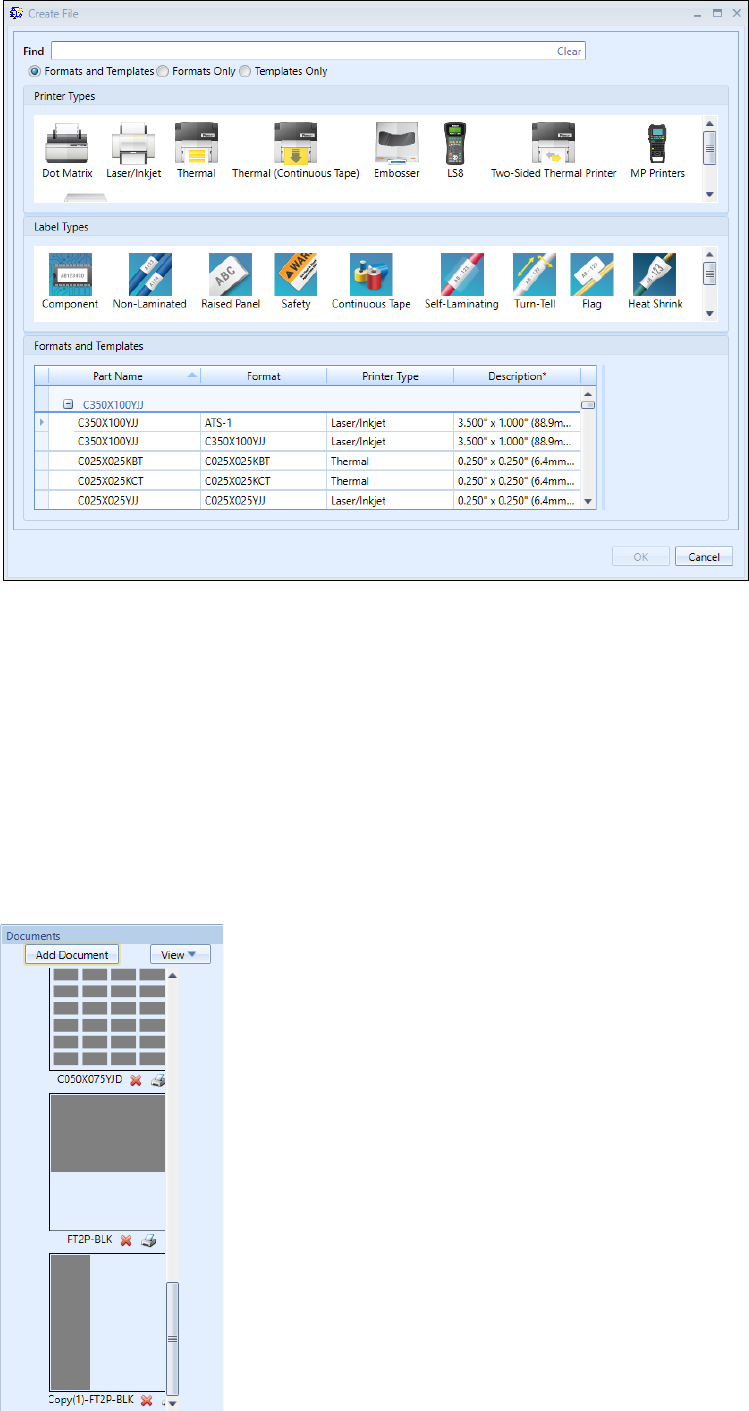
You can create a new file in Easy-Mark Plus™ either from the Landing Page, which appears when
you open the application, or from the Toolbar Ribbon.
To create a new file from the Landing Page:
1. In the Formats and Templates list, select the name of the preferred format on the basis of
which you want to create a new file. On the right you can see the preview of the selected
format.
2. If needed, filter the Formats and Templates list by selecting the icon of the preferred
printer type, media type, or both. You can also search for a specific format by entering the
corresponding criteria in the search box.
3. In the upper-right corner of the Landing Page, click Create > Project or Create >
Document, or double-click the selected format.
4. In the confirmation dialog, click Yes.
To create a new file from the Ribbon:
1. On the File tab of the Ribbon, click New. The Create File window appears.
2. In the Formats and Templates list, select the name of the preferred format on the basis of
which you want to create a new file. On the right you can see the preview of the selected
format or wizard.
3. If needed, filter the Formats and Templates list by selecting the icon of the preferred
printer type, media type, or both. You can also search for a specific format by entering the
corresponding criteria in the search box.
4. Click OK.
34
To create a new file by using one of the Easy-Mark Plus™ wizards:
1. Either on the Home or on the Insert tab of the Ribbon, in the Tools section, click Wizards.
2. Select the preferred wizard and follow the steps of this wizard.
To add new documents to your current project:
1. To the left of the document view, under Documents, click Add Document.
35
2. The Add new document window appears.
3. In the Formats and Templates list, select the name of the preferred format on the basis of
which you want to add a new document. On the right you can see the preview of the
selected format.
4. If needed, filter the Formats and Templates list by selecting the icon of the preferred
printer type, media type, or both. You can also search for a specific format by entering the
corresponding criteria in the search box.
5. Click Add.
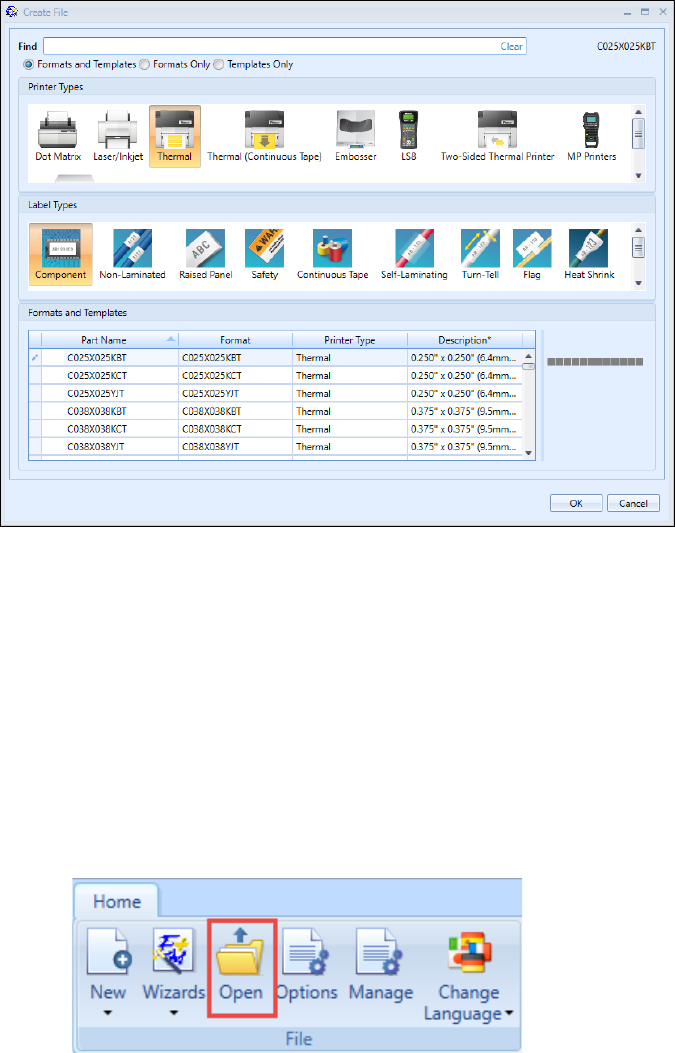
2.2. Opening Existing Files
You can open the existing files in Easy-Mark Plus™ either from the Landing Page, which appears
when you open the application, or from the Ribbon.
To open a file from the Landing Page:
1. On the Home tab of the Landing Page, click Open.
36
2. In the window that appears, double-click the file that you want to open.
To open a file from the Ribbon:
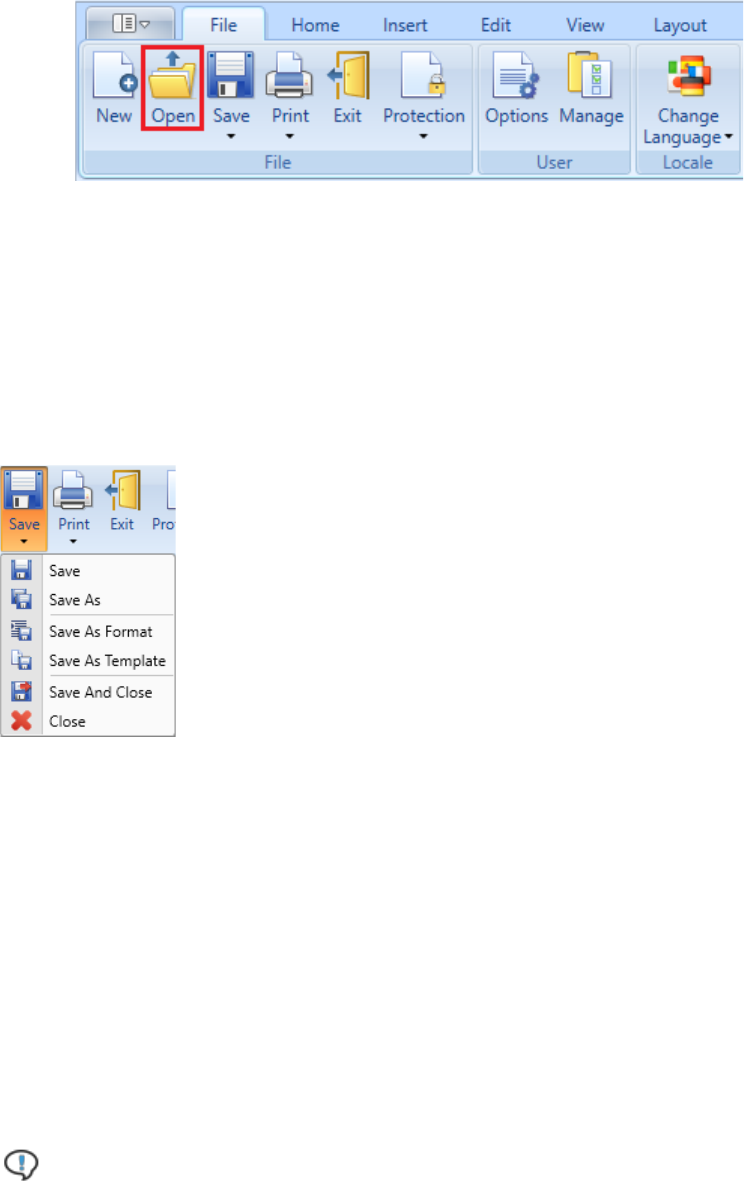
1. On the File tab of the Ribbon, click Open.
2. In the window that appears, double-click the file that you want to open.
2.3. Saving the Files
To save a file in Easy-Mark Plus™, click Save either on the File tab or on the Home tab of the
Ribbon. The following options are available:
• Save
• Save As: Save the file to a specific location and/or with another name.
• Save As Format: Create a new format on the basis of the file and add this format to the
favorites list, if needed.
• Save As Template: Create a new template on the basis of the file. If needed, protect this
template with a password and add it to the favorites list.
• Save and Close: Save the file and close the current project.
• Close: Close the current project. If the project has unsaved changes, a warning window will
appear, where you can choose whether to save or not to save these changes.
Note: All Easy-Mark Plus™ files are saved with the .pemx extension.
37
2.4. Printing Files
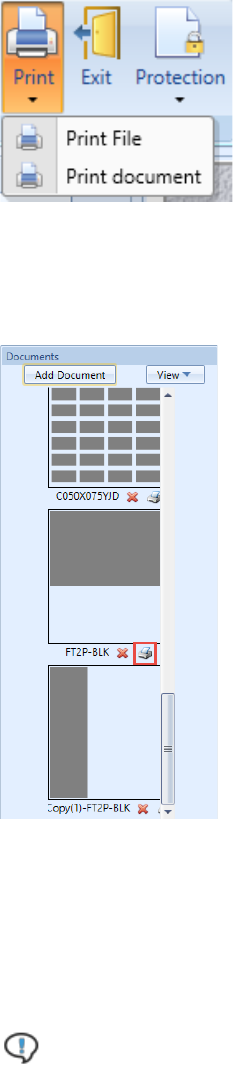
To print the entire project, click Print > Print File either on the File tab or on the Home tab of the
Ribbon. To print only a specific document:
• Click Print > Print document either on the File tab or on the Home tab of the Ribbon.
• Click the printer icon in the lower-right corner of the document preview, which is located on
the left side of the document view.
Easy-Mark Plus™ offers different settings for printing files and documents.
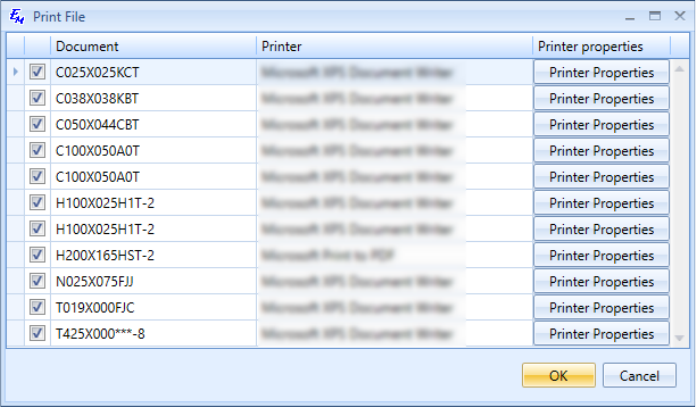
• Print File: Select the preferred printer, set up additional printer properties, if needed, and
then click OK to print the file.
Note: For each document, the Printer Properties button will open a specialized printer
properties dialog for that individual document/print instance, because each document
format can be associated with a specific printer.
38
• Print document: View and customize the following parameters:
o Printer: Select the preferred printer and set up additional printer properties, if
needed.
o Print range: Specify whether you want to print all labels or labels within a specific
range, for example, only the first ten labels.
o Copies: Specify the number of document copies that you want to print and decide
whether you want your printer to sort these copies.
o Features: Click this button to specify the number of a row and the number of a
column for the start print position as well as set up the print offsets for printers. An
offset is a position of the horizontal /vertical corner of the label. Offsets can be
applied to the Top (positive = vertical shift downward) or Left (positive = horizontal
shift to the right).
▪ For example, if the data on your labels is positioned too high, enter the Top
value (such as .1) to move the data down on the labels. Raise this value to
increase the offset.
▪ If the data on your labels is positioned too far to the left, enter the Left value
(such as .1) to move the data to the right. Raise this value to increase the
offset. Enter negative values (such as -.1) to decrease the offset and move
the data in the opposite direction.
▪ Select the Save Offsets checkbox to re-use the entered offset values in the
future. The saved offset will be applied to combination of specific printer and
format.
o Omit empty labels: Select this checkbox if you do not want to print the labels that
have no content.
o Align: Open the Print Alignment window to decide whether you want to print only
one label from the page, one row of labels, one column of labels, or the entire page.
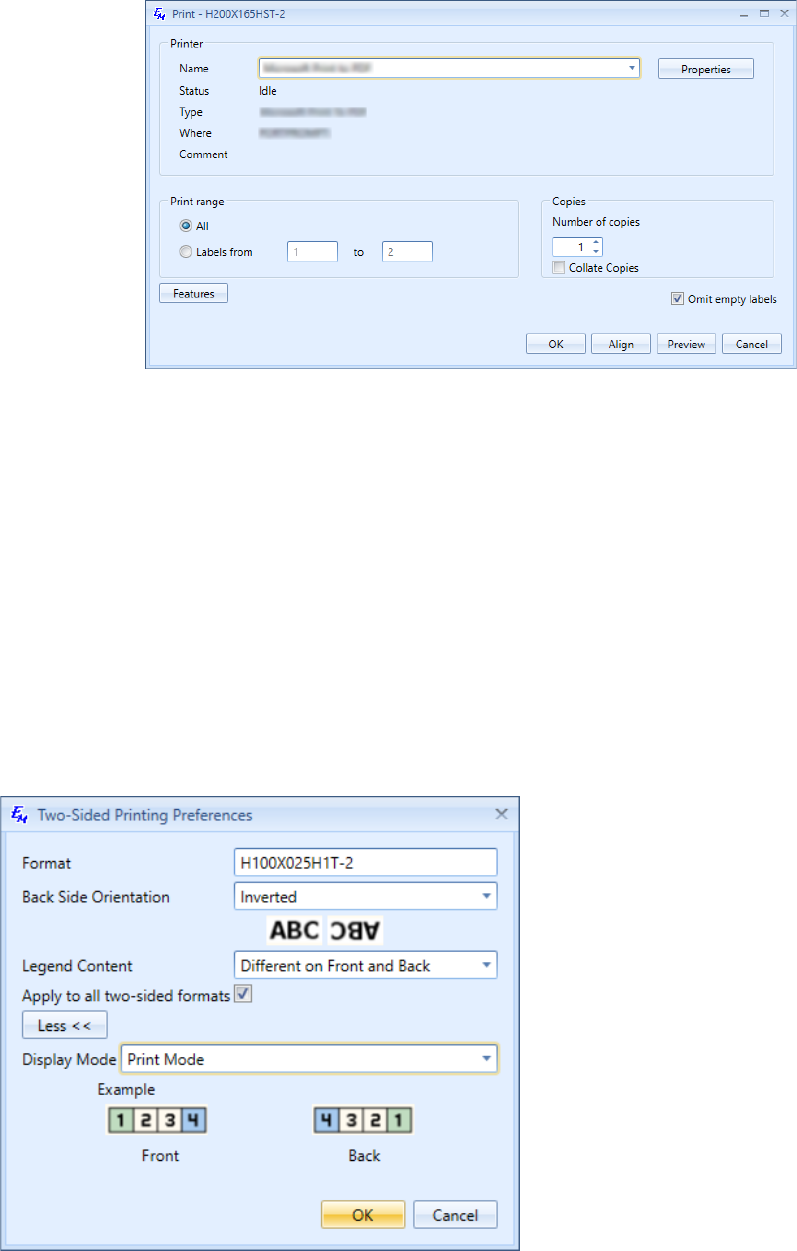
39
The purpose is calibration of the page before printing. If the document contains
more than one document (e.g. 100), print will include just first page (column, row,
etc). After you make your selection and click OK, the print preview window appears.
o Preview: Preview the document before printing.
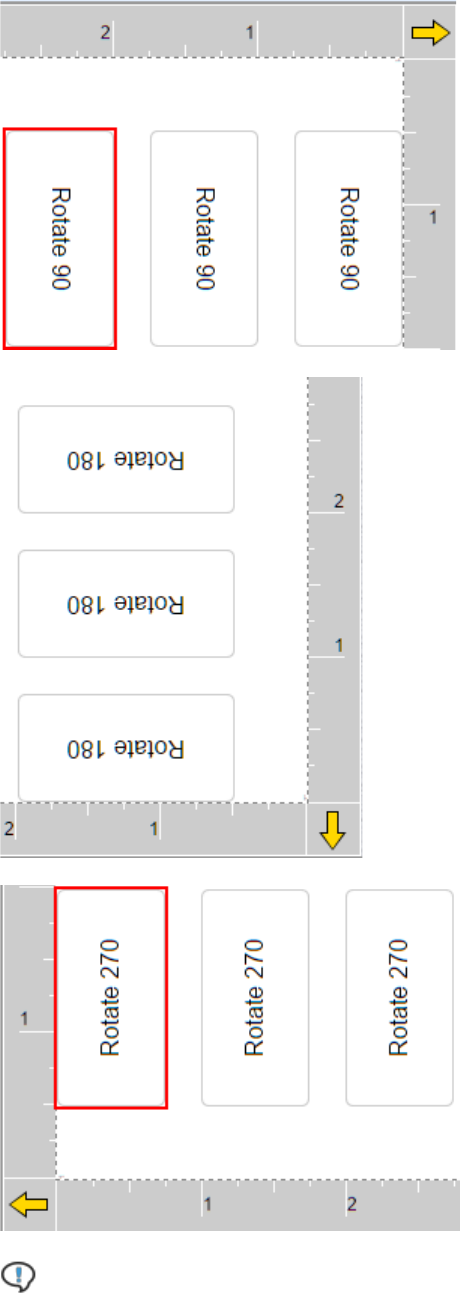
Two-Sided Printing
Easy-Mark Plus™ has label formats for two-sided printing. These formats can be used both in the
two-sided mode and in the single-sided mode. In the second case, Easy-Mark Plus™ looks and
feels just as with any standard format.
The Two-Sided Printing section of the Layout tab is active only for those types of printers that
print on both sides of paper, for example, the Two-Sided Thermal Printer printer type. When you
create a new project or document for this printer type, the Two-Sided Printing Preferences
window appears.
40
This window offers the following options:
• Format: Non-editable field that contains the name of the format that you selected for the
two-sided printer.
• Back Side Orientation: Specify whether to rotate the back side content of the
corresponding label by 180 degrees as related to the front side of the corresponding label.
• Legend Content:
o Same on Front and Back: When this mode is selected, any content that you create
on the front side is automatically copied to the back side. In this mode you can edit
label content only on the front side.
o Different on Front and Back: Select this mode to independently edit the content on
the front side and on the back side.
• Apply to all two-sided formats: Select this checkbox to save these settings for all two-
sided formats.
• Display Mode: Select between the two available display modes:
o Edit: Labels on the back side are ordered the same way as on the front side.
o Print Mode: Labels on the back side are ordered as they will appear when they are
printed, i.e. in reverse order of their front side counterparts.
You can also access the most of these options in the Two-Sided Printing section of the Layout
tab:
• Two-Sided On/Off: Turn on this option to split the label document in two columns, as they
will appear when printing on two sides. The first column represents the front side of the
corresponding labels while the second column represents the back side.
• Normal/Inverted: Turn on this option to rotate the back side content of the corresponding
label by 180 degrees as related to the front side of the corresponding label.
• Edit/Print Mode: Switch between the edit and print display modes.
• Legend Content Same/Different: Switch between the Same on Front and Back and
Different on Front and Back.
• Preferences: Open the same Two-Sided Printing Preferences window that appears
when you create a new project or document for the two-sided printer type.
41
2.5. Protecting Files
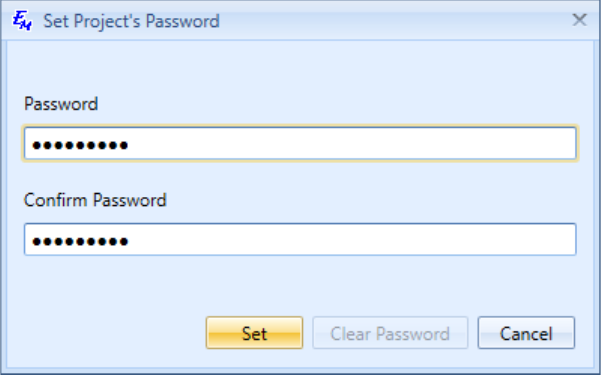
You can protect your Easy-Mark Plus™ label file with a password. For this purpose, do the
following:
1. On the File tab of the Ribbon, click Protection > Set Password.
2. In the Set Project's Password window, type a password for your project, confirm it, and
then click Set.
3. To change the password, click Protection > Set Password, confirm the password, click
Clear Password, and then reopen the window to create a new password
42
3. Objects Overview
3.1. Inserting the Graphical Objects
Either on the Home tab or on the Insert tab of the Ribbon, you can add various graphical objects
to your labels.
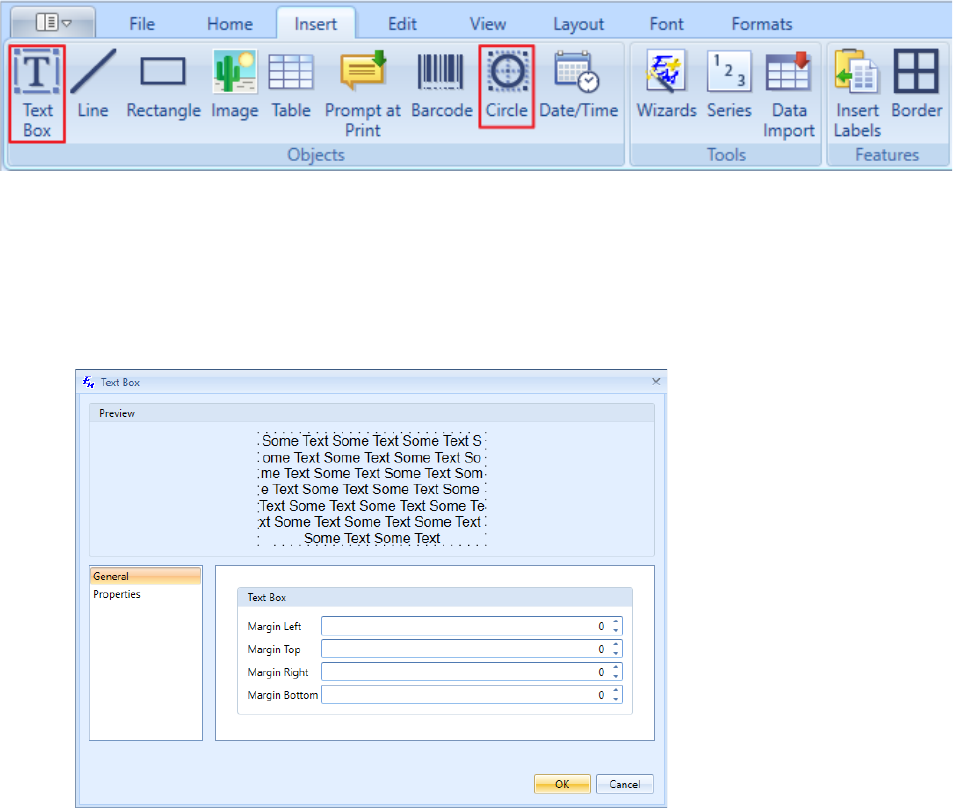
Inserting the Text Boxes
A text box is a rectangle of any size that can be filled with text. You may need text boxes if you
wish to separate the text from the rest of the label.
Text box insertion can be initiated from the Home tab or the Insert tab of the Ribbon. Clicking
Text Box will allow you to click and drag the mouse, to draw a text box in the active label. Once its
drawn, text can be added. After completion, right-click on the text box and select Properties, to
open a properties window of the text box object.
The window for a rectangular text box has two tabs: General and Properties.
• On the General tab, you can see the preview of text flow in the text box and specify
margins for this text. The preview dynamically changes as you change the values.

43
• On the Properties tab, specify whether the text box object should have a fixed position or
flow with text. If the text box object has a fixed position, you can choose not to print it by
selecting the Non printable checkbox. If the text box object should flow with text, you can
customize its width and height. Finally, here you can select the background color of your
text box object and set up its transparency. The preview dynamically changes as you
change the values.
Text boxes can be modified outside of the properties dialog, as well. You can double-click it to
enter additional text. You can resize it by dragging the edges of the object. You can also rotate the
text boxes.
• You can add serialization to the textboxes. Object series behaves the same way as regular
series (see The Series part). To add a series, enter the text box in edit mode and click
Series on the Insert tab of the Ribbon to open the Series dialog window. Upon accepting
the dialog, the text box will be repeated on each adjacent label, for each element of the
series. If necessary, new labels will be created, to contain these new text boxes. Within
Label edit-mode, deleting a text box, that contains a series, splits the series.
Note: There can be only one series per textbox.
44
• You can add Barcode with series to the textboxes. Barcode with series behaves the same
way as regular series (see The Series part). To add a Barcode with series, select text box
and click Barcode on the Insert tab of the Ribbon to open the Barcode dialog window.
Select Series as data Source, on Properties select In-Line. Upon accepting the dialog, the
text box will be repeated on each adjacent label, for each element of the series. If
necessary, new labels will be created, to contain these new text boxes. Within Label edit-
mode, deleting a text box, that contains a series, splits the series. A label, which contains a
series-based barcode, is copied and pasted. After pasting the label, the barcode is no
longer in a series and should move to a text-based barcode and include the same code it
did previously.
45
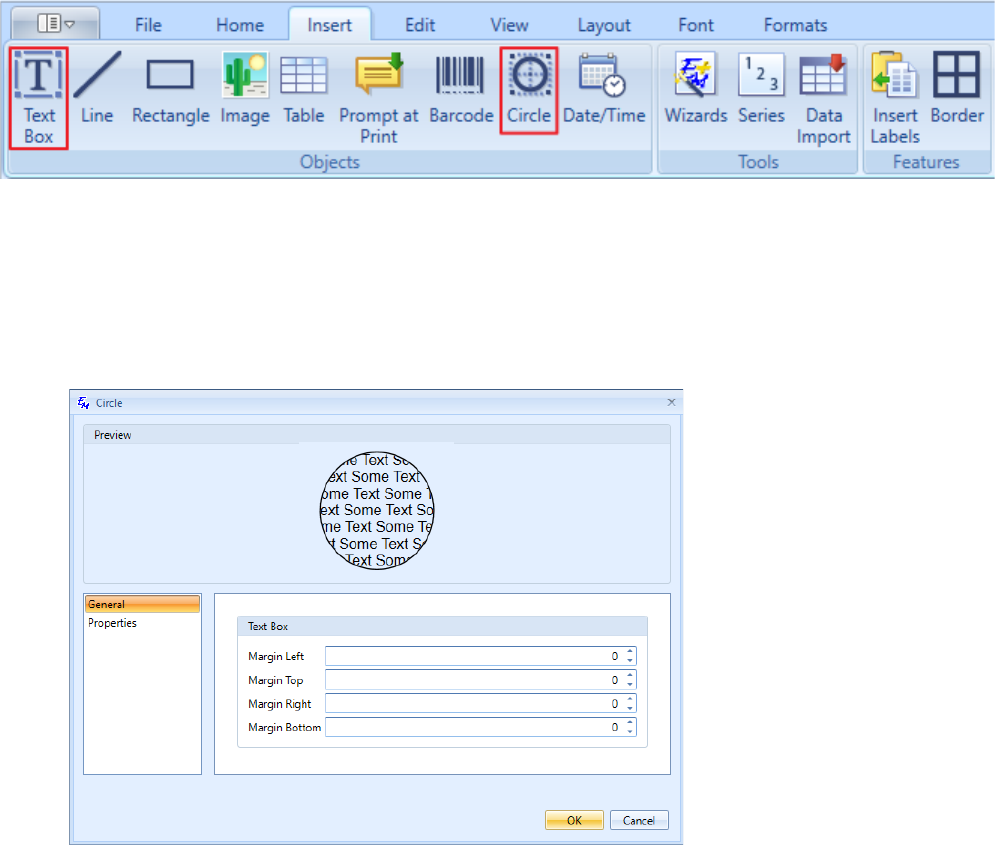
Inserting Circles
To insert a circular text box, click Circle to open the Circle properties window.
The window for a circular text box has two tabs: General and Properties.
• On the General tab, you can see the preview of text flow in the text box and specify
margins for this text. The preview dynamically changes as you change the values.
• On the Properties tab, specify whether the text box object should have a fixed position or
flow with text. If the text box object has a fixed position, you can choose not to print it by
selecting the Non printable checkbox. If the text box object should flow with text, you can
customize its width and height. Finally, here you can select the background color of your
text box object and set up its transparency. The preview dynamically changes as you
change the values.
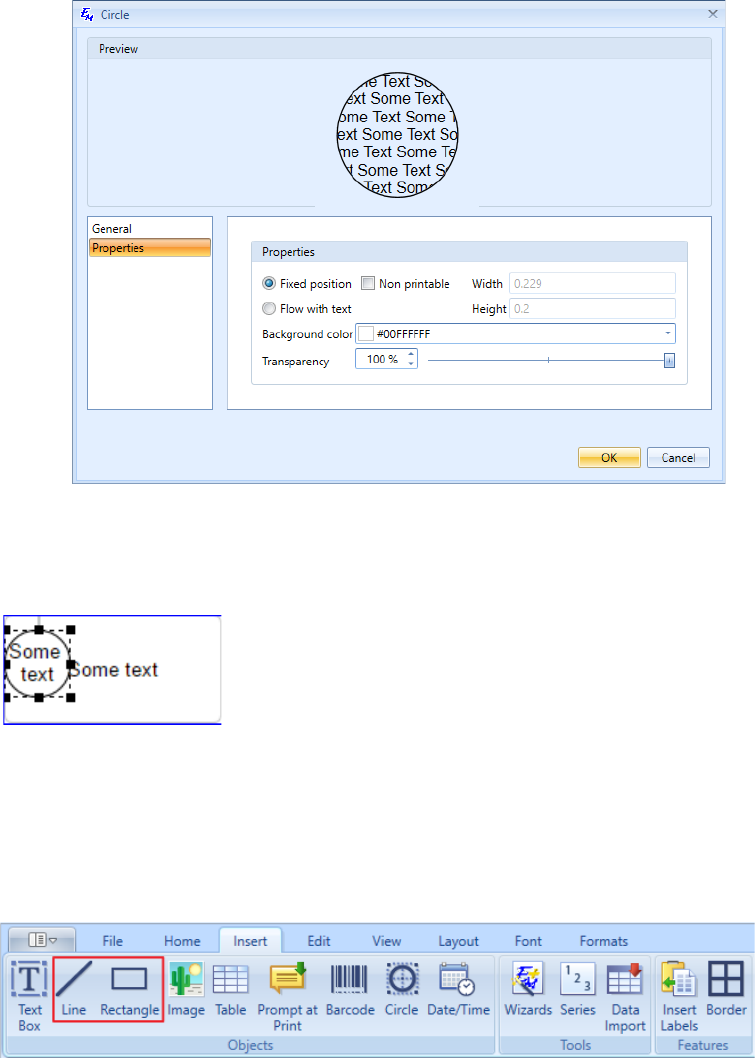
46
When you are ready with the settings, click and drag your mouse to draw a circular text box, and
then double-click it to enter the text. You can also rotate the circular text boxes.
Inserting the Lines and Rectangles
You can add lines and rectangles to your labels. On the Insert tab of the Ribbon, click Line or
Rectangle to open a properties window of the corresponding object.
The line and rectangle objects have the same properties window. The window has two tabs:
General and Properties.
• On the General tab, you can see the preview of a line or a rectangle as well as specify the
line color, line size (thickness), and dash type. The preview dynamically changes as you
change the values.
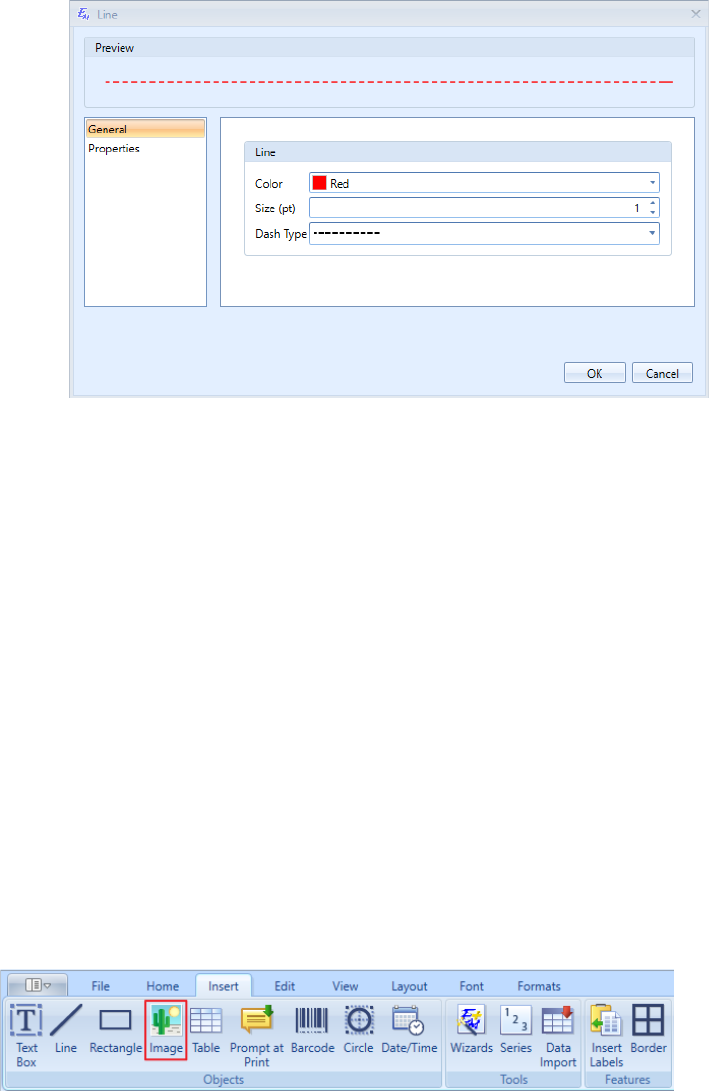
47
• On the Properties tab, specify whether the line or rectangle object should have a fixed
position or flow with text. If the line or rectangle object has a fixed position, you can choose
not to print it by selecting the Non printable checkbox. If the line or rectangle object should
flow with text, you can customize its width and height. Finally, here you can select the color
of your line or rectangle object and set up its transparency. The preview dynamically
changes as you change the values.
When you are ready with the settings, click and drag your mouse to draw a line or a rectangle. You
can also rotate the rectangles.
Inserting Images
You can decorate your labels with images. Either on the Home tab or on the Insert tab of the
Ribbon, click Image to open a properties window of the image.
The window has two tabs: General and Properties.
• On the General tab, browse for the image that you want to insert onto the label. After you
select the image, it will appear in the preview pane on the top of the window. The preview
dynamically changes as you change the values. Select the Image library checkbox if you
want to select the image from the library. Besides, the following image editing options are
available:
o Inverse color
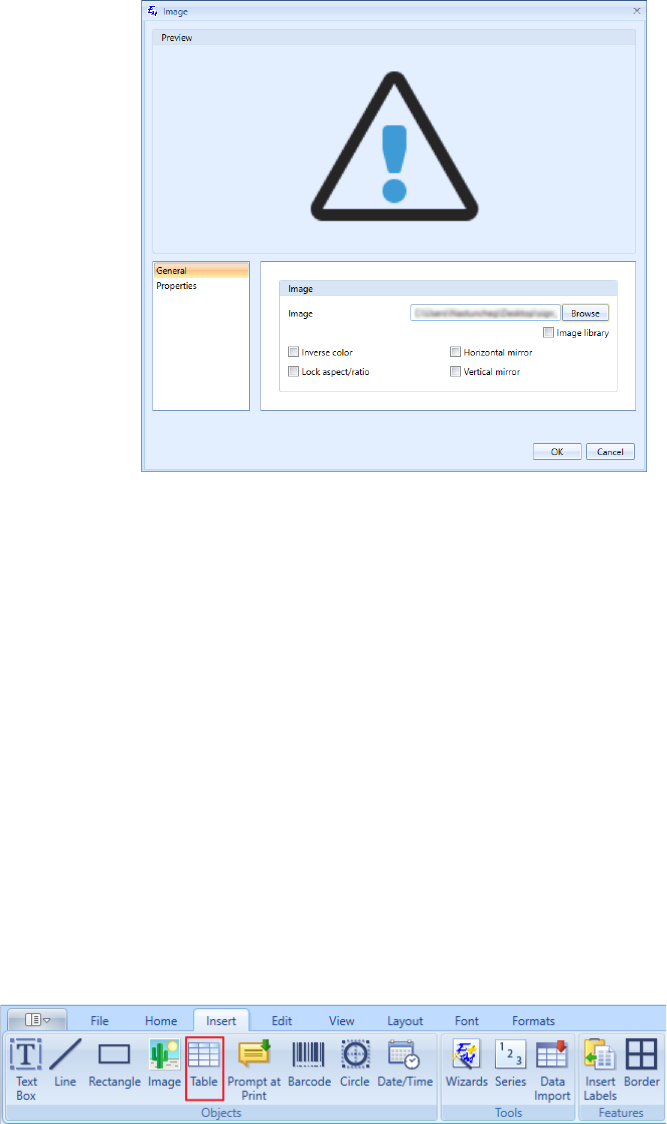
48
o Lock aspect/ratio: Select this checkbox if you do not want the width of the image to
change as you change the height of the image, and vice versa.
o Horizontal/Vertical mirror: Select these checkboxes to reflect the image
horizontally or vertically.
• On the Properties tab, specify whether the image object should have a fixed position or
flow with text. If the image object has a fixed position, you can choose not to print it by
selecting the Non printable checkbox. If the image object should flow with text, you can
customize its width and height. Finally, here you can select the background color for your
image object and set up its transparency.
When you are ready with the settings, click and drag your mouse to insert the image. You can also
rotate the images. The preview dynamically changes as you change the values.
Inserting Tables
You can add tables to your labels. On the Insert tab of the Ribbon, click Table to open a properties
window of the corresponding object.
The window has two tabs: General and Properties.
• On the General tab, specify the number of rows and columns for your table.
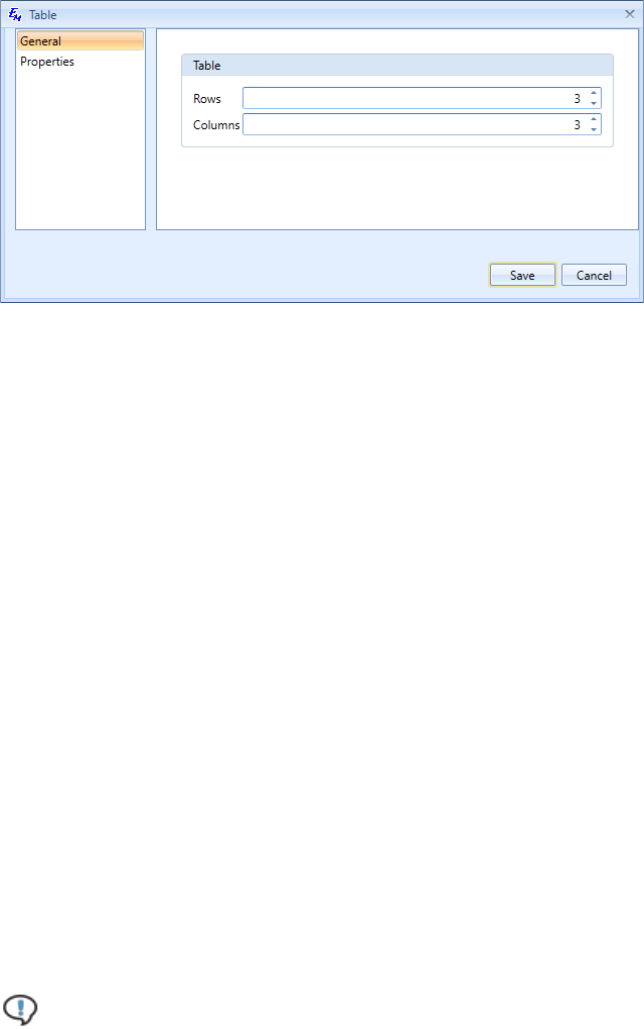
49
• On the Properties tab, specify whether the table object should have a fixed position or flow
with text. If the table object has a fixed position, you can choose not to print it by selecting
the Non printable checkbox. If the table object should flow with text, you can customize its
width and height. Finally, here you can select the background color for your table object.
When you are ready with the settings, click and drag your mouse to draw a table. You can also
resize and rotate the tables, using the highlighted handles on the edge of the table. After placing
the table, content can be added to each cell. You will see that many label operations can be
applied to each cell. To add text to a cell, click the cell and type. For detailed editing of a cell,
double-click to produce a cursor at an intended location.
• You can add serialization to the tables. To add a series, select the destination cells and click
Series, on the Insert tab of the Ribbon. Series would be applied to the selected cells in the
table.
If the defined series exceeds the number of selected cells, the table can be replicated to
adjacent labels, and the series continues within corresponding cells. To allow the replication,
open Advanced tab on the Series dialog window and mark “Across Tables” checkbox. To
insert the series within the limits of selected cells, uncheck “Across Tables” checkbox.
Note: There can be only one “Across Tables” series per table.
• You can add series based barcode to the tables. To add a series based barcode, select the
destination cells and click Barcode, on the Insert tab of the Ribbon. Select Series as Data
Source, then In Properties check In Line. Upon Saving, Series based barcode would be
applied to the selected cells in the table.
If the defined series based barcode exceeds the number of selected cells, the table can be
replicated to adjacent labels, and the series based barcode continues within corresponding
cells. To allow the replication, open Advanced tab on the Barcode dialog window and mark
“Across Tables” checkbox. To insert the series based barcode within the limits of selected
cells, uncheck “Across Tables” checkbox.
50
3.2. Creating a Prompt at Print
A prompt at print is an input field where the user should enter some text before printing the
document. Let's assume that we should prompt the user to enter the actual date before printing.
For this purpose, do the following:
1. On the Insert tab of the Ribbon, click Prompt at Print to open a properties window of the
corresponding object.
2. On the General tab, enter the input field name in the Input field prompt field, for example,
Insert Date.
3. If you want to restrict the length of the text that should be entered in the input field, click the
drop-down arrow next to the Length list and select Fixed, Max, or Min.
4. Enter the length value in the corresponding field.
5. If you want to restrict you text by numeric values only, select the Numbers only checkbox.
For our example, the checkbox should be selected if the user is supposed to enter the date
in the numeric format.
6. If you want the prompt to appear for each label that belongs to a group, select the At each
label of the group checkbox. As a result, a prompt window, which will appear before
printing the labels, will contain the Next button. This button will allow you to navigate
between the label-specific prompts.
Note: The text that is entered in the first screen of the prompt window is automatically
copied to the next screens of this window.
51
When you are ready with the settings, click and drag your mouse to draw a prompt box. The
prompt window will appear the next time when you print your labels.
3.3. Inserting the Date and Time
You can add date and time to your labels. For this purpose, perform the following steps:
1. On the Insert tab of the Ribbon, click Date/Time to open a properties window of the
corresponding object.
52
2. On the General tab, select the date and its format from the corresponding lists. The default
date is the current date, but you can change it. If you do not want to change the date every
time, select the Auto date checkbox, and Easy-Mark Plus™ will use only the current date
and time as determined by the settings on your computer. Change date by option allows
incrementing the displayed date from the current date (Y:+1, D:-5, etc.). The range for
resulting date value is limited to the period from Jan 1, 0000 to December 31, 9999. Month,
Day, Year, Hour, Minute, Second is allowed to be incremented and limited to (-9999 9999).
On the Date Format select Custom, you will see Custom value field and a button to the right of the
"Custom Value" editable field entitled "Tips". Click this button to see a popup of custom character
definitions. The popup will close when the you click "save" and exit the Date Item Window. You can
edit the "Custom value" field while the popup is open. The pop up can be disabled by clicking the
"Tips" button again OR clicking the "X" in the top right hand corner of the screen. Use an escape
character (") for inserting plain text within a date/time format in the "Format value" field. The
escape character should precede and follow the inserted characters. (eg: "PANDUIT")
53
3. On the Properties tab, specify whether the date object should have a fixed position or flow
with text. If the date object has a fixed position, the resulting object should be sized to fit to
the content, Autosize check-box will be checked by default when the "in-line" option is
chosen, also you can choose not to print it by selecting the Non printable checkbox. If the
date object should flow with text, you can customize its width and height. Finally, here you
can select the background color of your date object and set up its transparency.
4. On the Formatting tab, you can alter the font size, font, color, background, bold,
underline, italics and uppercase.
Note: To change the date format:

54
1. Go to the File tab.
2. In the User section, click Options to open the Options window.
3. In the Options window, click the Locale tab.
4. Select the required date format from the Default Date format list.
When you are ready with the settings, click anywhere on the label, and the date will appear.
3.4. Inserting the Barcodes
You can add barcodes to your labels. For this purpose, perform the following steps:
1. On the Insert tab of the Ribbon, click Barcode to open a properties window of the
corresponding object.
2. On the General tab, specify the following data:

55
o Symbology:
Symbology is the encoding method and output format of the barcode. Each
symbology is defined by a standards organization. The symbology dictates what
format the code must follow and how to construct the symbol for the barcode.
Depending on the selected symbology, various fields on this screen may be
activated or deactivated. For example, specific symbologies may not use a
supplemental symbology, so the Supplement Code field becomes disabled if one
of these symbologies is selected.
o Width X-Dimension: The narrowest part of the barcode's symbology. This field is
filled in automatically on the basis of the selected symbology, but you can customize
this value.
o Height: Height of the barcode's symbology. This field is filled in automatically on the
basis of the selected symbology, but you can customize this value.
o Code: The data value that is used to create a symbol for the barcode. The code
must meet the requirements of a selected symbology standard (e.g., UPC
symbologies support only numeric codes). By default, Text will be chosen as the
data source, and the Code field will be enabled. If Text is chosen as the data
source for the barcodes, you can enter the code for the barcode symbol in the Code
field.
56
o Supplement Code: By default, the Supplement Code field is disabled. If the UPC
or EAN symbology is selected, the Supplement Code field becomes activated,
allowing the user to enter additional characters for the symbol.
o Data Source: Values in this field group are filled in automatically depending on the
chosen symbology. If the data is taken from the series, the Serialization tab
becomes active. This tab contains the same fields as the Serialization tool that can
be accessed either from the Home tab or from the Insert tab of the Ribbon. Choose
one of the available methods for creating codes for the barcodes:
▪ Human Readable Text: Select this checkbox to decide whether the created
barcode symbol displays the code as part of the symbol. Selection of this
checkbox will activate the fields in the Text group.
▪ Text: Default selection.
▪ Series source: Select this option if the data for the barcode is taken from
the series. As a result, the Serialization tab becomes active. This tab
contains the same fields as the Serialization tool that can be accessed either
from the Home tab or from the Insert tab of the Ribbon.
▪ Import: Select this option if you are going to import the data for the barcode
from external source. As a result, the Import Preview tab becomes active.
Click this tab to see how your imported data will look like.
o Advanced Properties:
▪ Checksum type: This choice is determined by the selected symbology. If a
symbology only uses one checksum calculation, this checksum type will be
automatically selected from the drop-down list.
▪ Supplement symbology: This option becomes active when the UPC-A or
EAN-13 symbology is selected. As a result, additional code will be inserted
next to the main barcode.
▪ PDF security: This option becomes active when the Pdf417 symbology is
selected. As a result, you can select the security level for this type of
symbology.
▪ Wide to Narrow Ratio: This option specifies the width of the wide bars in
the symbol as a multiple of the narrow width.
3. On the Properties tab, specify whether the barcode object should have a fixed position or
flow with text. If the barcode object has a fixed position, you can choose not to print it by
selecting the Non printable checkbox. If the barcode object should flow with text, you can
customize its width and height.
When you are ready with the settings, click Save, and the barcode will appear on the label where
you can continue editing it.

57
3.5. Working with Inserted Objects
In the Objects section on the Edit tab of the Ribbon, you can perform various actions with the
already inserted objects.
• Properties: View the properties window of the currently selected object. The same window
appears when you are going to insert an object onto your label. You can also view this
window either by right-clicking the object and selecting Properties, or just by double-
clicking the object.
• Arrange: If you have a stack of objects, you can arrange them by using the following
functionality:
o Bring To Front: Place an object at the front of the stack.
o Bring Forward: Place an object one step towards the front.
o Send To Back: Place an object at the back of the stack.
o Send Backward: Place an object one step closer to the back.
• Align: If you have a stack of objects, you can align them by using the following
functionality:
o Align Left: Place the objects closer to the left-side border of the label. You can also
access this functionality by right-clicking the labels, pointing to Align and selecting
Left.
o Align Center: Stretch the objects proportionally to the left-side and right-side
borders of the label. You can also access this functionality by right-clicking the
labels, pointing to Align and selecting Center.
o Align Right: Place the objects closer to the right-side border of the label. You can
also access this functionality by right-clicking the labels, pointing to Align and
selecting Right.
o Align Top: Place the objects closer to the top border of the label. You can also
access this functionality by right-clicking the labels, pointing to Align and selecting
Top.
o Align Middle: Place the objects at the center of the label. You can also access this
functionality by right-clicking the labels, pointing to Align and selecting Middle.
o Align Bottom: Place the objects closer to the bottom border of the label. You can
also access this functionality by right-clicking the labels, pointing to Align and
selecting Bottom.
58
o Distribute Horizontally/Vertically: Place the objects at equal distance from one
another, either horizontally or vertically.
• Fit: Stretch the objects proportionally to the borders of the label.
• Snapping: Snapping is related to objects inside the label. It allows to organize one object
as related to another object.
Note: Snapping works only when you move the objects, not when you change their
form.
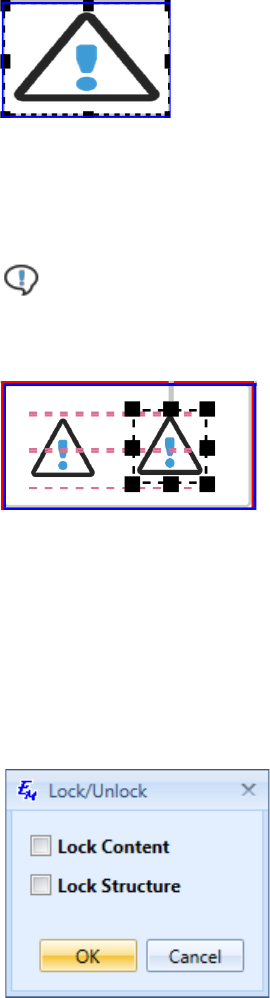
• Lock/Unlock: This function offers the following options:
o Lock Content: Protect the content of the selected label from editing and prohibit
entry of new content.
o Lock Structure: Protect from changes everything except the content (all elements
that are associated with the table, including cell borders).
In the Editing section of the Edit tab, you can convert any selected series and imported data into
plain text, by using the Separate function. After the operation has been applied, the series or
imported data become a simple text with all decoration preserved. When the selected series or
import data items are located in objects (textbox, barcode, or table), the objects will be separated
too. All related objects will become independent, not linked or grouped. You can also access this
functionality by right-clicking the series, imported data or barcode with series or imported data and
59
selecting Separate.
In the Tables section of the Edit tab, you can edit the tables that are inserted onto your labels.
Easy-Mark Plus™ offers the standard table editing options, such as merging or splitting the table
cells, inserting or deleting the table rows and columns, and customizing the row and column size.
60
4. Working with Labels
4.1. Editing the Labels
The Edit tab of the Ribbon offers the following label editing functionality:
• Undo/Redo: Undo or redo your last action (equal to the Ctrl+Z and Ctrl+Y keyboard
shortcuts).
• Select All: Select either all labels on the current page or the entire content of the current
label. The Select All Labels option is also available in the menu that appears when you
right-click the labels.
Note: The currently selected labels are highlighted with red, whereas the labels that are
currently being edited are highlighted with blue.
• Group: Select several labels while holding Ctrl or Shift, and then click Group to
synchronize the content changes of these labels. You can also cancel or change the group
behavior by clicking Ungroup or Regroup, accordingly.
Note: The Group and Ungroup options are also available in the menu that appears
when you right-click the labels.
• Insert Labels: Insert a predefined number of blank labels before or after the selected label.
• Delete: Remove either the entire label or its content. You can also remove the entire label
by right-clicking it and selecting Delete Label(s).
• Generate Template: Create a template based on the selected label. This action will add a
new document to the current project. The new document:
o is based on the selected label,
o inherits the format definition and label content from the previous document,
o has the selected label as first one in the list; if no label is selected, then the first
label is used for template creation,
o can be saved as template.
• Search: Find or replace specific content.
61
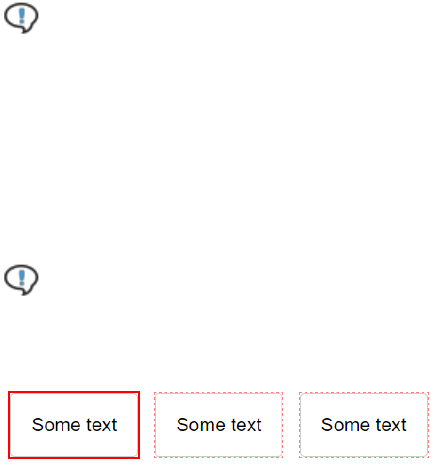
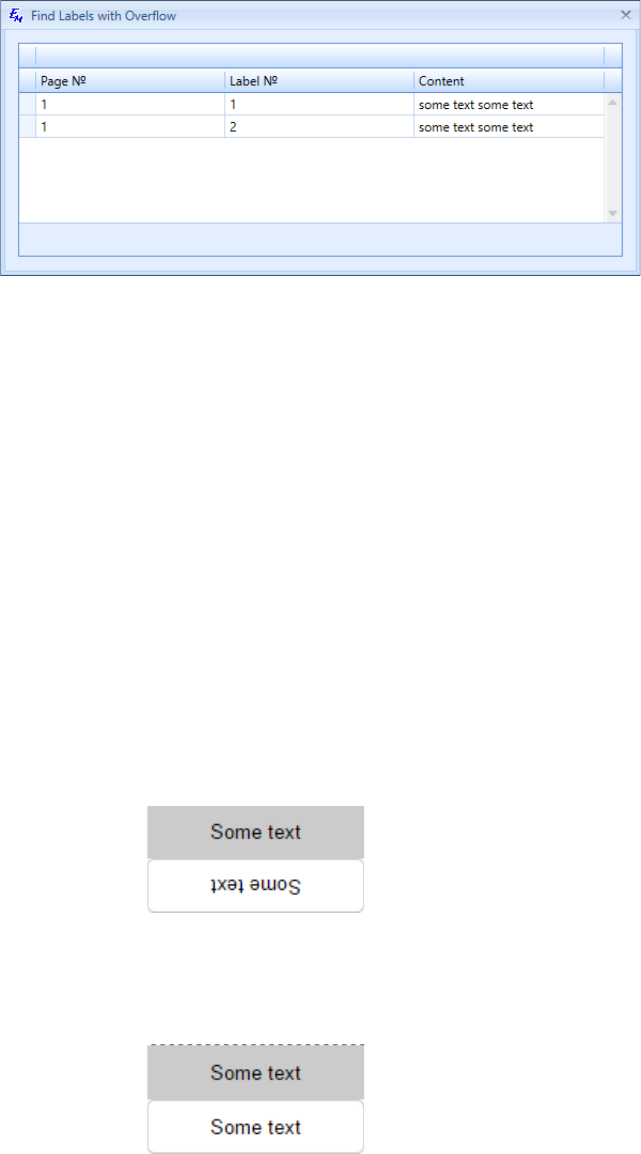
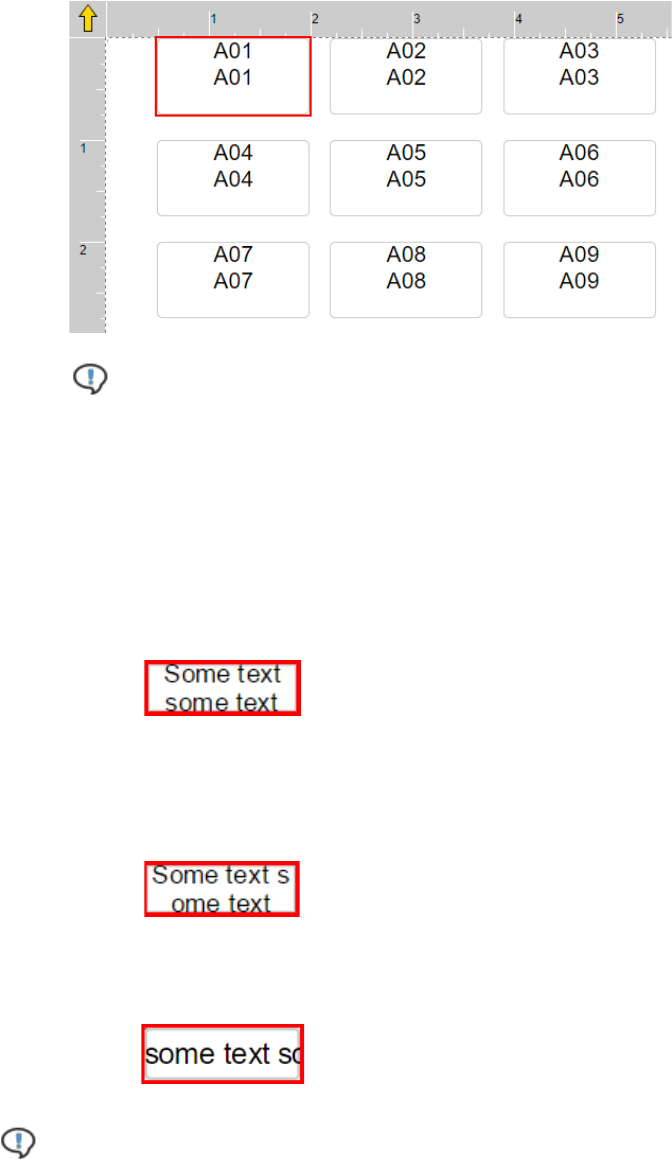
In Easy-Mark Plus™, you can also detect labels with overflow, i.e. with non-wrapped text or image
that goes beyond the label borders. For this purpose, go to the Home tab and click Find Overflow
in the Tools section. The Find Labels with Overflow window will show the number of the label,
the number of the page where it is located, and the content of this label.
4.2. Customizing the Label Layout
You can set up the layout of your labels on the Layout tab of the Ribbon.
Label Modes
The Label Modes section of the Layout tab is active for all types of formats and printers. The
following label modes are available:
• Flag: Select one of the predefined label layouts:
o The labels are divided in two parts horizontally. Text in the lower part is entered
(alignment - up and left) and is reflected in the upper part (alignment – bottom and
right). The upper part is grayed out.
o The labels are divided in two parts horizontally. Text in the upper part is entered and
is reflected in the lower part. The upper part is grayed out.

62
o The labels are divided in two parts horizontally. Text in upper part is entered and is
reflected in the lower part. Text in lower part is rotated 180 degrees. The lower part
is grayed out.
o The labels are divided in two parts horizontally. Text in the upper part is entered and
is reflected in the lower part. The lower part is grayed out.
o The labels are divided in two parts vertically. Text in the left p-side part is entered
and is reflected in the right-side part. Text in the right-side part is rotated 180
degrees. The right-side part is grayed out.
o The labels are divided in two parts vertically. Text in the left-side part is entered and
is reflected in the right-side part. The right-side part is grayed out.
o The labels are divided in two parts vertically. Text in the right-side part is entered
(alignment - up and left) and is reflected in the left-side part (alignment – bottom and
right). The left-side part is grayed out.
o The labels are divided in two parts vertically. Text in the left-side part is entered and
is reflected in the right-side part. The left-side part is grayed out.
63
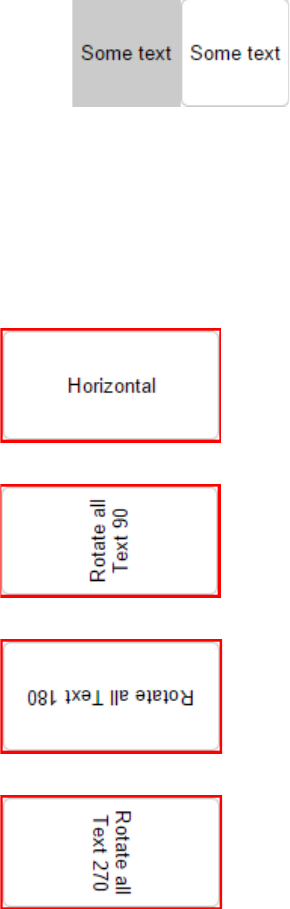
• Text Direction: Switch from the standard horizontal text direction to one of the three
available rotation options, specifically 90, 180, and 270 degrees. You can also access the
text direction options by right-clicking the labels, pointing to Text Direction and selecting
one of the preferred rotation options.
• Wiremarker: When labeling wires, an often-used technique is to repeat or "stack" data
several times on a label so that the information can be seen easily after the label is
wrapped around the wire. Wiremarker automates this task for you.
When creating wiremarker labels, you may want to take advantage of the Wiremarker mode
in Easy-Mark Plus™. Toggle the Wiremarker mode on and off by clicking the Wiremarker
toolbar button. As a result, all text on the label will be repeated as many times as possible
depending on the size of the label. For example, consider that you have the below labels
created for marking wires:
64
Note: The number of repeats on the wiremarker depends on the combination of label
size and font size. For example, if you change the font size in this wiremarker to 8 pt., more
lines will appear on the label.
• Wrap Mode: This option is active when you select a label or enter text in a label. The
following wrap modes are available:
o Word Wrap: Text on the selected label is wrapped on word delimiters.
o Char Wrap: Text on the selected label is wrapped on characters on horizontal
limits.
o No Wrap
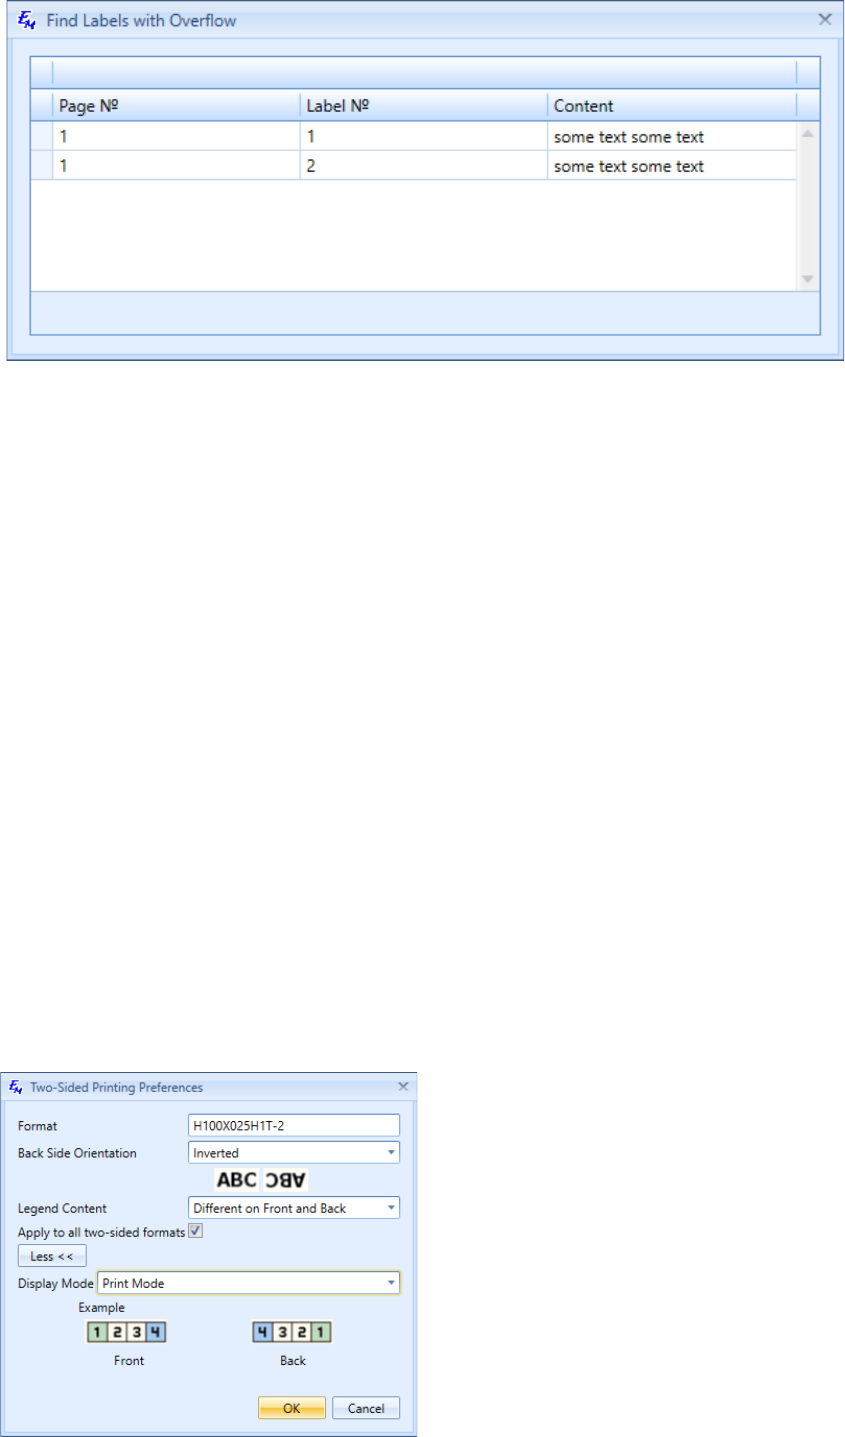
Note: If you select No Wrap, the text may go beyond the borders of your label. As a result,
Easy-Mark Plus™ will issue a warning before allowing you to print the labels with such overflow.
However, Easy-Mark Plus™ has the functionality that detects such labels. For this purpose, go to
the Home tab and click Find Overflow in the Tools section. The Find Labels with Overflow
window will show the number of the label, the number of the page where it is located, and the
content of this label.
65
Continuous Formats
The Continuous Formats section of the Layout tab is active only for those types of printers that
print on continuous paper from large uncut reels, for example, the Thermal (Continuous Tape)
printer type. In this section, you can either specify the fixed length of the continuous tape label or
turn on the Dynamic Length mode. As a result, the length of the tape will dynamically change as
you type the text or insert some other content.
Two-Sided Printing
Easy-Mark Plus™ has label formats for two-sided printing. These formats can be used both in the
two-sided mode and in the single-sided mode. In the second case, Easy-Mark Plus™ looks and
feels just as with any standard format.
The Two-Sided Printing section of the Layout tab is active only for those types of printers that
print on both sides of paper, for example, the Two-Sided Thermal Printer printer type. When you
create a new project or document for this printer type, the Two-Sided Printing Preferences
window appears.

66
This window offers the following options:
• Format: Non-editable field that contains the name of the format that you selected for the
two-sided printer.
• Back Side Orientation: Specify whether to rotate the back side content of the
corresponding label by 180 degrees as related to the front side of the corresponding label.
• Legend Content:
o Same on Front and Back: When this mode is selected, any content that you create
on the front side is automatically copied to the back side. In this mode you can edit
label content only on the front side.
o Different on Front and Back: Select this mode to independently edit the content on
the front side and on the back side.
• Apply to all two-sided formats: Select this checkbox to save these settings for all two-
sided formats.
• Display Mode: Select between the two available display modes:
o Edit: Labels on the back side are ordered the same way as on the front side.
o Print Mode: Labels on the back side are ordered as they will appear when they are
printed, i.e. in reverse order of their front side counterparts.
You can also access the most of these options in the Two-Sided Printing section of the Layout
tab:
• Two-Sided On/Off: Turn this option on to split the label document in two columns, as they
will appear when printing on two sides. The first column represents the front side of the
corresponding labels while the second column represents the back side.
• Normal/Inverted: Turn this option on to rotate the back side content of the corresponding
label by 180 degrees as related to the front side of the corresponding label.
• Edit/Print Mode: Switch between the edit and print display modes.
• Legend Content Same/Different: Switch between the Same on Front and Back and
Different on Front and Back.
• Preferences: Open the same Two-Sided Printing Preferences window that appears
when you create a new project or document for the two-sided printer type.

67
4.3. Customizing the Label View
You can set up the view of your labels on the View tab of the Ribbon.
• Features: Specify whether to show the ruler in the work area and select the preferred
measurement unit (inches or millimeters).
• Rotate View: Rotate the view of your labels by selecting the preferred rotation angle,
specifically 90, 180, and 270 degrees.
68
Note: When you select the Continuous Tape format, the label view is rotated to 270
degrees by default.

69
• Navigation: Navigate between your labels and label pages. The following navigation
functionality is available:
o First Label: Go to the very first label in the document.
o Previous Label: Go to the label to the left of the currently selected label. If the
currently selected label is the first on the page, the selection will move to the last
label on the previous page, if such page exists. This option is inactive if the first
label on the first page of the document is selected.
o Next Label: Go to the label to the right of the currently selected label. If the
currently selected label is the last on the page, a new label page is created after
clicking Next Label.
o Last Label: Go to the very last label in the document.
o First Page: Go to the very first page in the document. This option is inactive if a
label on the first page of the document is already selected.
o Previous Page: Go to the page that is located before the current page and select
the first label on this page. This option is inactive if a label on the first page of the
document is selected.
o Next Page: Go to the page that is located after the current page and select the first
label on this page. This option is inactive if a label on the last page of the document
is selected.
o Last Page: Go to the very last page in the document. This option is inactive if a
label on the last page of the document is already selected.
4.4. Using the Serialization Tool
In Easy-Mark Plus™, you can generate an alphanumeric or numeric sequence of any length and
step and place it evenly on your labels. Let's suppose that you need to create an alphanumeric
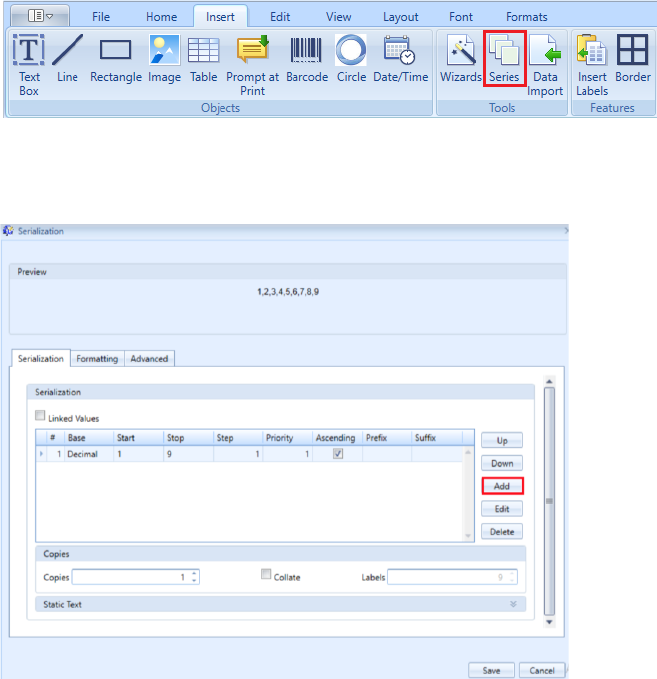
70
sequence with the letters A, B, and C, followed by the even numbers from 2 to 100. For this
purpose, do the following:
1. Go either to the Home tab or to the Insert tab.
2. In the Tools section, click Series to open the Serialization window.
3. To the right of the values table, click Add to create a new table line.
4. The Series Part window appears. In the Base list, click the drop-down arrow and select
Alpha.
5. In the Start field, leave the default value, a.
6. In the Stop field, enter c.
7. Leave the default values in the Step and Priority fields.
8. Leave the Ascending checkbox selected.
9. Select the Uppercase checkbox, and then click Save.
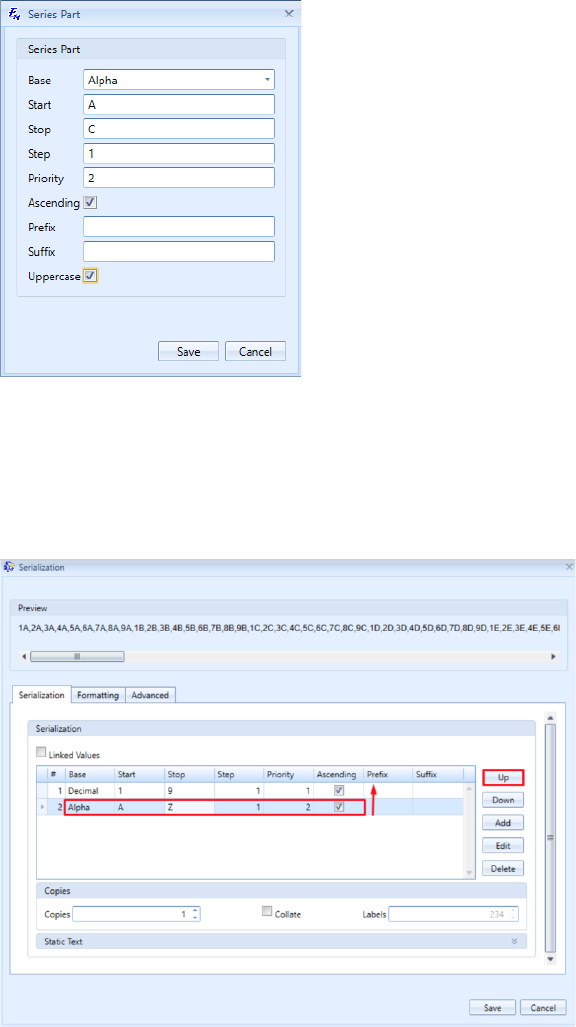
71
10. As a result, a new line will appear in the values list. This list already has a default line for
decimals, and the new line is under this default line. As our letters should go before the
numbers, select the new line and click Up.
11. Select the decimal line and click Edit to open the same Series Part window.
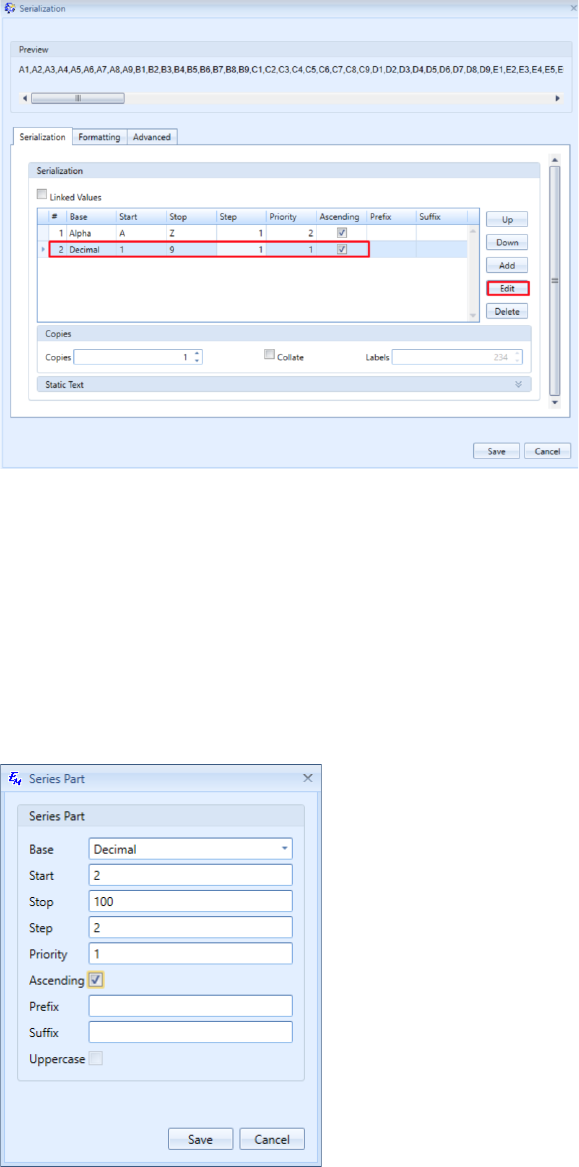
72
12. In the Base field, leave the default value.
13. In the Start field, enter 2.
14. In the Stop field, enter 100.
15. In the Step field, enter 2, because in this example you need only even numbers.
16. Leave the default value in the Priority cell.
17. Leave the Ascending checkbox selected, and then click Save.
18. The example sequence will be shown in the Preview pane. By default it will have
approximately the following view: A2, A4, A6..., B2, B4, B6..., etc. To link series check
Linked Values checkbox. As a result, the sequence will have approximately the following
view: A2, B4, C6…, etc.
73
19. If needed, go to the Formatting tab to customize the fonts of your sequence, and then click
Save. The sequence will appear on your labels. If there is not enough labels for the
sequence, Easy-Mark Plus™ will automatically add the required number of labels.
20. In the Copies and Static Text sections, you can also add the static text prefix and suffix to
your sequence. Moreover, you can specify the number of copies for your sequence if you
want to repeat it.

74
• You can add serialization to objects – text boxes, tables and barcodes. Object series
behaves the same way as regular series (see part above).
• To add a series to a text box, enter the object in edit mode and click Series on the Insert
tab of the Ribbon to open the Series dialog window. The text box will be repeated on labels
in series. Within Label edit-mode, deleting the text box, containing series, splits the series.
Note: There can be only one series in a textbox.
• To add a series to a table, select the cells of the table and click Series on the Insert tab of
the Ribbon. Series would be applied to the selected cells in the table.
If the defined series exceeds the number of selected cells, the table can be replicated to
adjacent labels, and the series continues within corresponding cells. To allow the
replication, open Advanced tab on the Series dialog window and mark “Across Tables”
checkbox. To insert the series within the limits of selected cells, uncheck “Across Tables”
checkbox. Note: There can be only one “Across Tables” series in a table.
Series in a table can have direction (Left-to-Right, Right-to-Left, Top-to-Bottom, Bottom-to-
Top) which is defined on Advanced tab of the Series dialog window.
• In the Editing section of the Edit tab, you can convert any selected series into plain text, by
using the Separate function. After the operation has been applied, the series will become
simple text with all decoration preserved. When the selected series items are located in
objects (textbox, barcode, or table), the objects will be separated too. All related objects
will become independent, not linked or grouped. You can also access this functionality by
right-clicking the series and selecting Separate.
4.5. Importing Data from an External Source
To import data to Easy-Mark Plus™ from external sources, do the following:
1. Go either to the Home tab or to the Insert tab of the Ribbon.
2. In the Tools section, click Data Import to open the Import wizard.
3. Select the type of the file that you are going to import: delimited file, Excel file, or XML file.
4. Click Next.
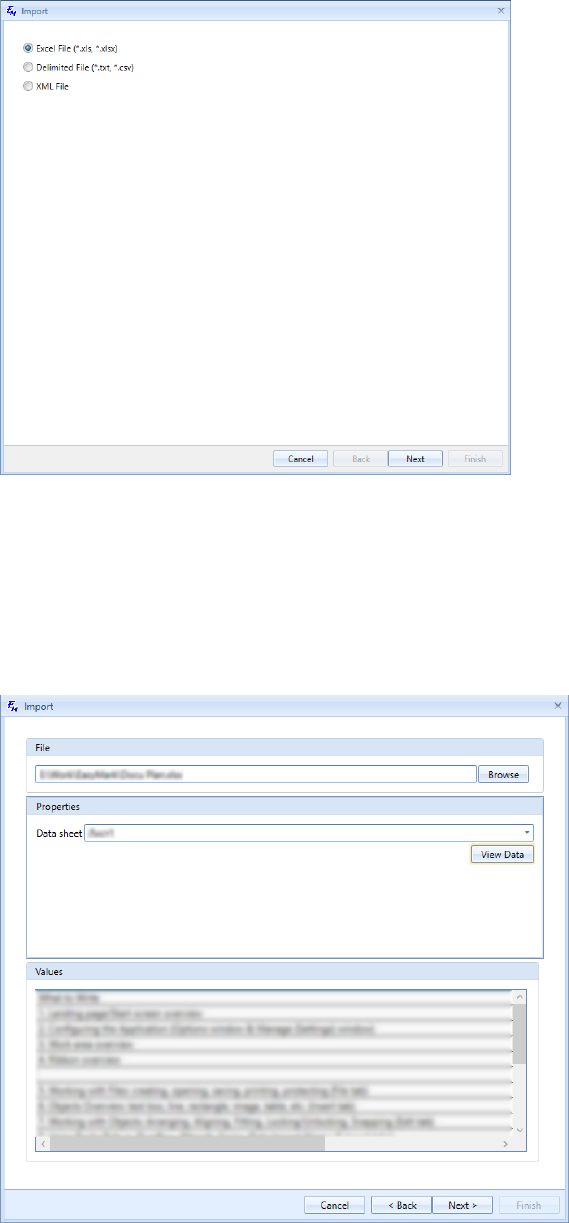
75
5. Click Browse to select the file that you are going to import.
6. In the Properties section, select either a delimiter (for delimited files and XML files) or a
data sheet (for Excel files).
7. Click View Data to preview the content of the file, and then click Next.
8. Set up the import properties. Specifically, enter the identifiers of row and column range by
which the imported data should be limited and the number of copies and labels. In addition,
specify whether to insert the imported data before or after the current label, and whether to
collate it. When you are ready with the settings, click Apply.
9. In the Values section, you can edit the output file:
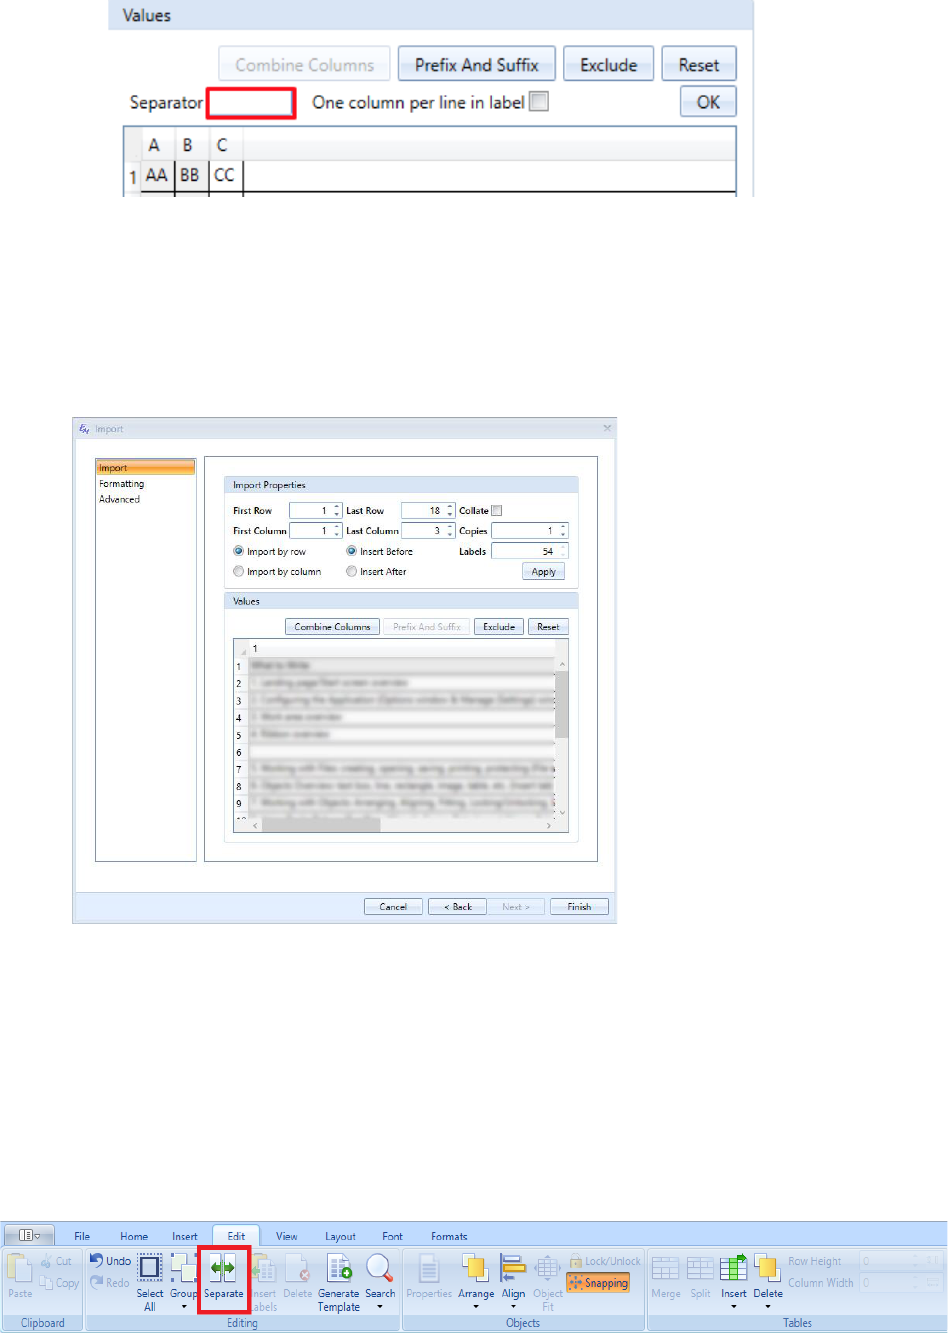
76
o Combine Columns: Merge two or more columns. You can combine by adding a
Separator or check the One column per line in label checkbox.
o Prefix and Suffix: Enter the prefix and suffix for your imported data.
o Exclude: Delete the selected row.
o Reset: Return the original look and feel of the output file.
10. Click Finish.
In the Editing section of the Edit tab, you can convert any selected data import item into
plain text, by using the Separate function. After the operation has been applied, all of the
data import elements will become simple text with all decoration preserved. When the
selected data import items are located in objects (textbox, barcode, or table), the objects
will be separated too. All related objects will become independent, not linked or grouped.
You can also access this functionality by right-clicking the series and selecting Separate.
77
4.6. Creating Templates
Easy-Mark Plus™ supports the creation of custom reusable templates, which can contain the
format and content of a frequently used label or sign. It also supports locking of objects and text
entry within a label. To create reusable signs or marker labels, where only certain parts of the
label should be editable, follow these steps:
1. Create a file or add a document based on the required format.
2. Within the document, compose a label that contains all of the desired content for your
template.
3. When the design is complete, apply a lock to any features that should not be modified
during future use. To apply a lock, select the target feature and click the Lock/Unlock
button on the Edit tab.

78
The following types of features are lockable:
• The label itself (text entry and border)
• Images
• Shapes (Line, Circle, Rectangle, etc.)
• Text boxes
• Tables and table cells
• Prompt at Print
• Barcode
• Date/Time
79
4. Confirm that all of the desired text entry areas (cells, text boxes, etc.) are unlocked (able to
accept text, etc.)
5. Select the label and click Save as Template.
6. Enter a meaningful name to help future users find the template.
7. Optionally, select the Add to Favorites checkbox to enable easy access without searching.
8. Optionally, enter a password to prevent unauthorized adjustment of the protected areas
during future use.
9. Click Save.
When saved, the created template is available for use. For documents that are created from the
Landing Page or by using the Add Document button, each contained label will include the
template content and inherit the associated locks. When using the Apply Template dialog, the
user will see only the templates that were created based on the format of the current document.
Besides, the Apply Template button applies the template content only to the selected label(s).
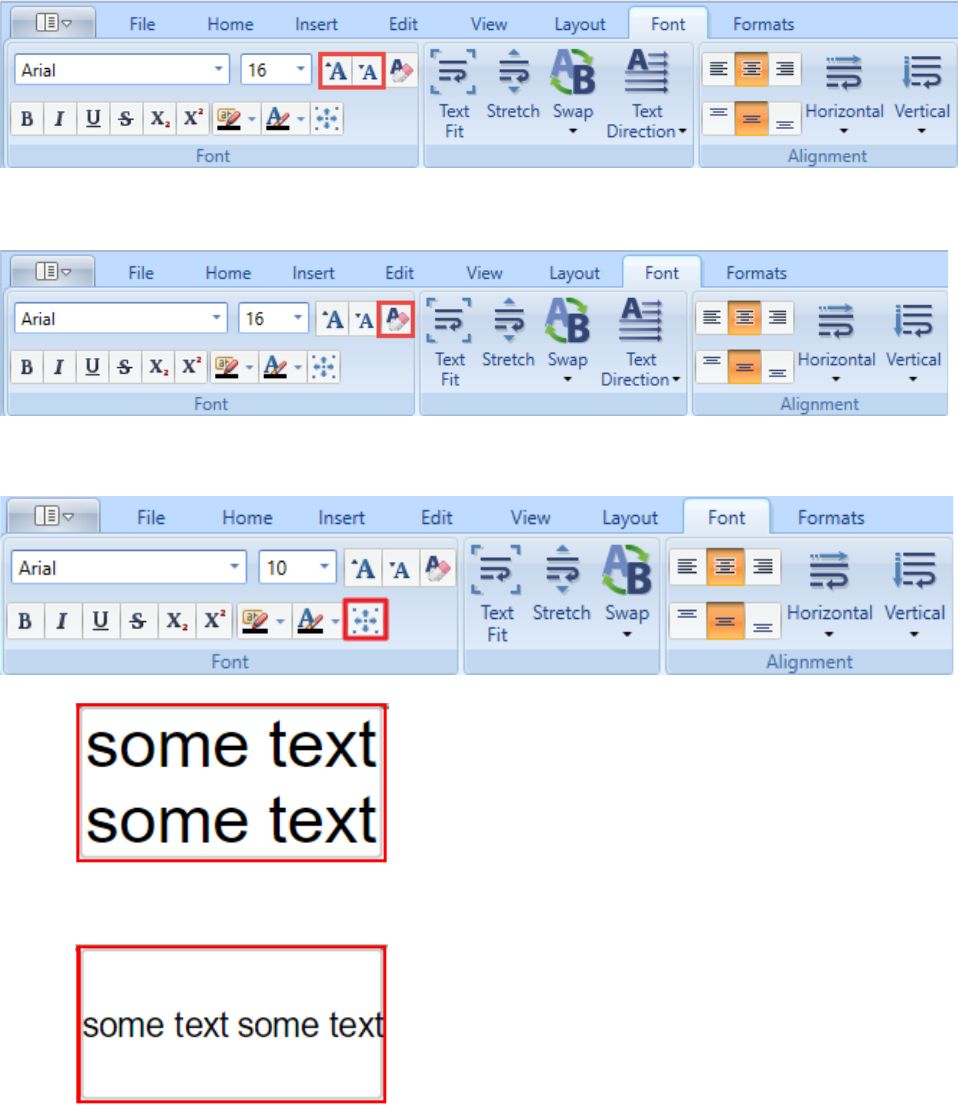
80
5. Working with Fonts and Formats
5.1. Working with Fonts
On the Font tab and on the Home tab of the Ribbon, you can find the standard font formatting
options, such as font family, font size, font type, font color, etc. In addition to these standard
options, you can customize fonts on your labels as follows:
• Increase/Decrease: Make your font either 1 pt bigger or 1 pt smaller.
• Clear Formatting: Remove the formatting that was applied to your font.
• Autosize: Fit the text to the label's width and height.
• Text Fit: Adjust the content of the selected labels to optimally fill the available label area.
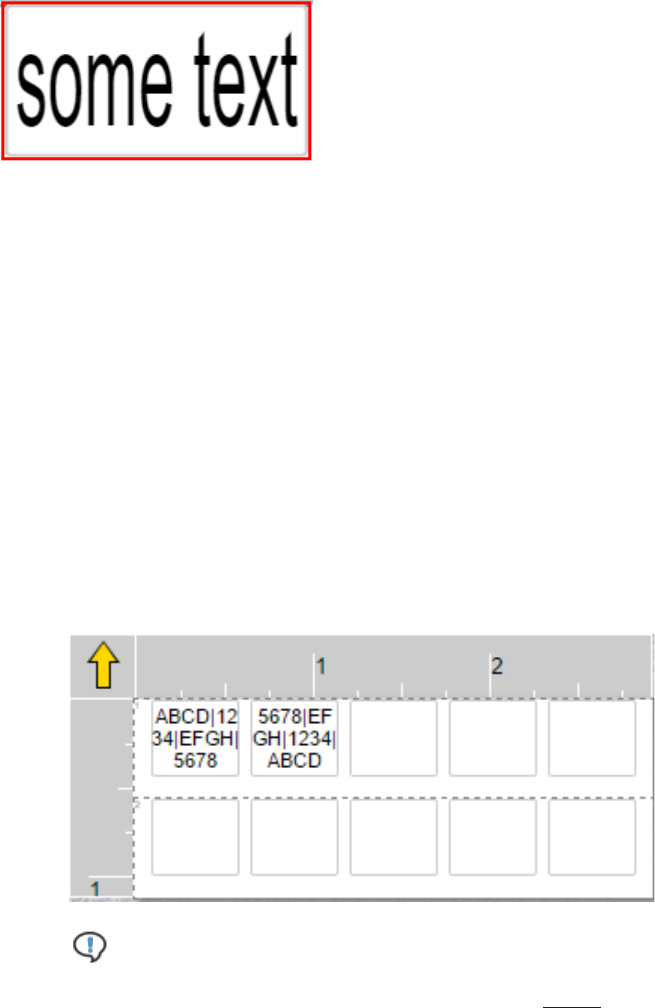
81
• Stretch: Stretch the selected labels vertically to fill as much label area as possible.
• Swap: Reverse the order of delimited text strings or paragraphs either within a single label
or on a new label. Several swap options are available:
o Horizontal Swap: Reverse the order of text strings in a paragraph within the
selected label. The text strings should be separated with delimiters, such as |. For
example, ABCD|1234|EFGH|5678 becomes 5678|EFGH|1234|ABCD. If the
paragraph contains no delimiters, nothing happens it.
o Horizontal Swap on New Label: Insert a new label after the selected label with
copied and reversed content of the selected label. The text strings should be
separated with delimiters, such as |. For example, ABCD|1234|EFGH|5678 is now
followed by a new label with 5678|EFGH|1234|ABCD. If the paragraph contains no
delimiters, nothing happens to it.
Note: If the selected labels are part of a group, new labels are not part of the
group. If the selected labels contain elements of series, the new labels will cause a
split in the series, and will contain copies of the contained series elements.
o Vertical Swap: Reverse the order of line-based or text box-based paragraphs within
the selected label or text box. The paragraphs should be separated with carriage
return symbols. For example,
ABCD
1234
EFGH
5678 becomes
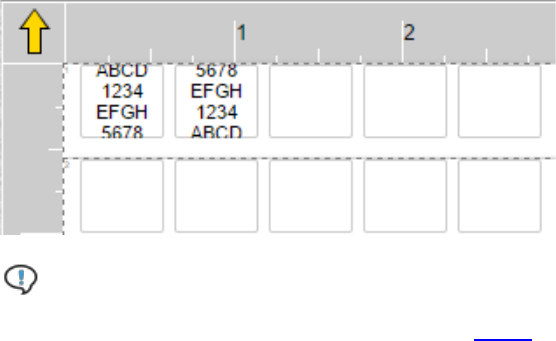
82
5678
EFGH
1234
ABCD
If there is only one line-based paragraph, nothing happens to it.
o Vertical Swap on New Label: Insert a new label after the selected label with copied
and reversed content of the selected label or text box. The paragraphs should be
separated with carriage return symbols. For example,
ABCD
1234
EFGH
5678 is now followed by a new label with
5678
EFGH
1234
ABCD.
If there is only one line-based paragraph, nothing happens to it.
Note: If the selected labels are part of a group, new labels are not part of the
group. If the selected labels contain elements of series, the new labels will cause a
split in the series, and will contain copies of the contained series elements.
• Text Direction: Switch from the standard horizontal text direction to one of the three
available rotation options, specifically 90, 180, and 270 degrees. You can also access the
text direction options by right-clicking the labels, pointing to Text Direction and selecting
one of the preferred rotation options.

83
• Alignment: Align the content to the left, center, or right of the label, combined with the top,
middle, or bottom alignment. Increase or decrease the horizontal and/or vertical spacing of
text.
5.2. Working with Formats
On the Formats tab of the Ribbon, you can access the following functionality:
• Document Formatting
o Switch Format: Open the format selection window to choose another format for
your current document.
o Document Properties: Open the Modify document properties window to
customize the format of your document. The same properties window appears when
you create a new format. For more information, see 1.5. Creating Formats, Printer
Types, and Media Types.
o Apply Template: Choose a predefined template for your document.
o Label Margins: Specify the size of margins for your labels. These are the distances
from the top and bottom and left and right of the label.
Note: The size values use the measurement units that were defined on the
Locale tab of the Options window. For more information, see 7. Configuring the
Application.
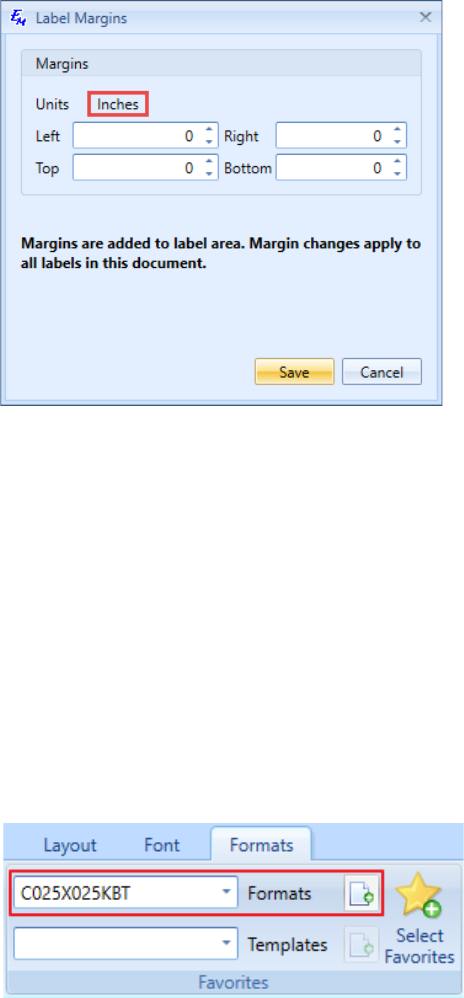
84
o Check for Format Updates. Look up the new available label formats.
• Favorites: In this section, you can quickly create new documents on the basis of your
favorite formats or templates, and add more formats to the favorites list.
To create a new document on the basis of your favorite format or template:
1. Select one of your favorite formats or templates from the corresponding drop-down
list.
2. Click the Add Document icon.
To add a format to the favorites list:
3. Click Select Favorites. The Select Favorite Formats window appears.

85
4. Select one or several formats (by holding the Shift or Ctrl key) from the list on the
left.
5. Click Add. As a result, the format will appear in the list on the right.
To remove formats from the favorites list:
6. Click Select Favorites. The Select Favorite Formats window appears.
7. Select one or several formats (by holding the Shift or Ctrl key) from the list on the
right.
8. Click either Remove to remove only the selected formats or Remove All to clear
the favorites list.
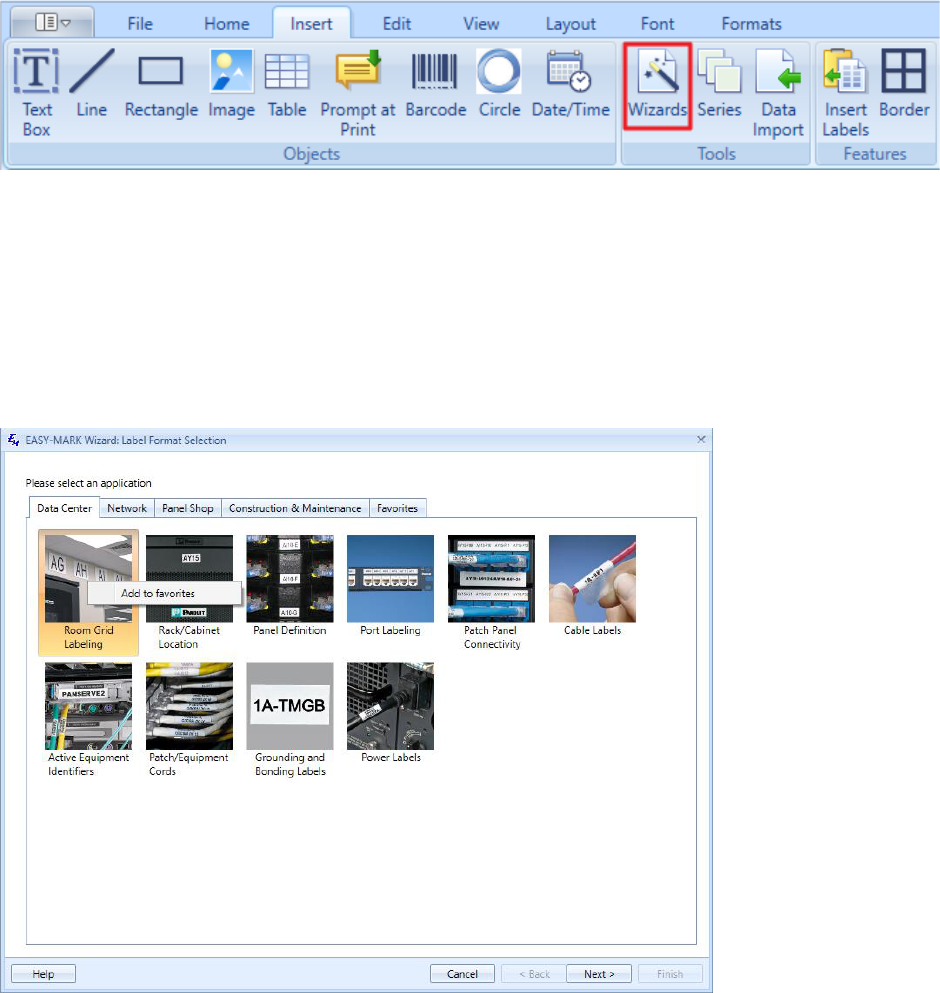
86
6. Working with Wizards
6.1. Wizard Overview
Easy-Mark Plus™ provides a set of wizards that help to select a label format that is appropriate for
a specific labeling task, and to generate label content for this format.
The wizards can be accessed from the Tools section either of the Home tab or of the Insert tab of
the Ribbon.
The wizard window has five tabs. The Data Center, Network, Panel Shop, and Construction &
Maintenance tabs group the label formats according to places where these labels are used. The
Favorites tab shows the formats that you added to your favorites list. To add the formats to the
favorites list, right-click the image with the name of the needed label format, and then click Add to
favorites.

87
Note: At this time only the Safety Sign Wizard is available. All other wizards will be available in
a future software update.
6.2. Safety Sign Wizards
Sign Generation Wizard
To create Safety sign labels by using the Easy-Mark Plus™ sign generation wizard:
1. Either on the Panel Shop tab or on the Construction & Maintenance tab of the Wizards
window, select Safety Signs, and then click Next.
2. Select EASY-MARK PLUS Sign Generation Wizard, and then click Next.

88
3. Click the drop-down arrow to select one of the available printer types.
4. Click the drop-down arrow to select one of the available sign size values.
5. The matching formats will automatically appear in the Format list at the bottom of the
window, based on the previously selected parameters. Choose the desired format.
6. Click Next.
7. The next screen will show a table with three columns:
o Image: Picture for the safety sign label.
o Header: Warning for the safety sign label, such as Caution or Danger.
o Legends: Description of the safety sign label.
Further options are available:
o Category: Select the safety sign category to display the corresponding safety sign
labels in the table below.
o Search: Look up a specific word in the legends of the selected category.
o Language: Select the language for the safety sign legends.
o Edit: Launch a dialog where you can change the legend, the header, or the image
file for the safety sign label. Such customized labels will be saved in the Custom
category.
o Copies: Enter the number of generated labels.
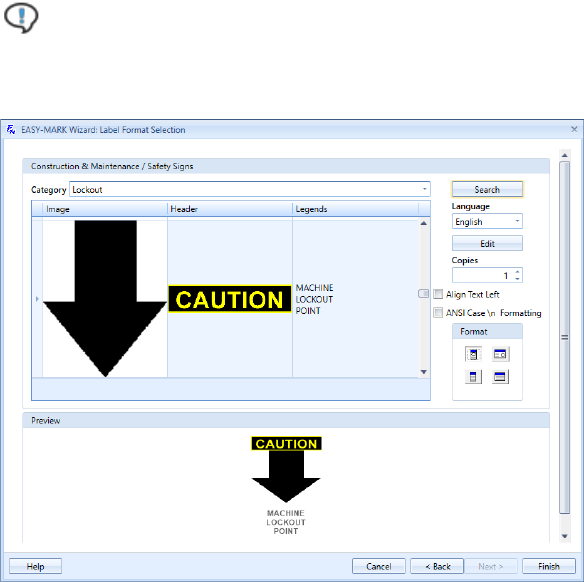
89
o Align Text Left: Select this checkbox to align the legend to the left of the label. If
the checkbox is not selected, the legend will be centered.
o ANSI Case Formatting: Select this checkbox to automatically change the first
character of the sign legend to uppercase, while making all following characters
lowercase. If the checkbox is not selected, the legend will default to the
capitalization of the saved legend.
o Format: Select one of the four available formats for your safety sign labels.
Note: All your changes will be reflected in the preview pane in the lower part of
the wizard window.
8. Click Finish.
Sign Templates
To create safety sign labels by using the Easy-Mark Plus™ sign templates:
1. Either on the Panel Shop tab or on the Construction & Maintenance tab of the Wizards
window, select Safety Signs, and then click Next.
2. Select Use pre-determined sign templates, and then click Next.
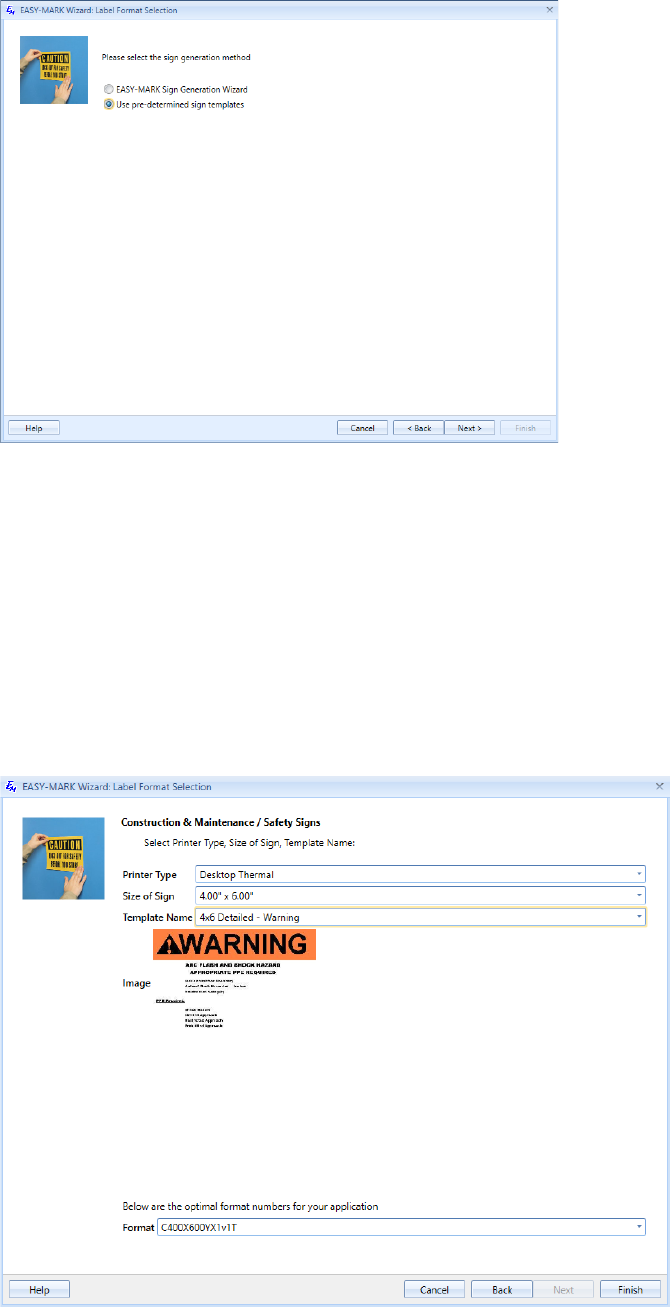
90
3. Click the drop-down arrow to select one of the available printer types.
4. Click the drop-down arrow to select one of the available sign size values.
5. Click the drop-down arrow to select one of the available template names. After you select
the template name, the safety sign image will be previewed below the Template Name list.
Click Browse to select a custom image.
6. The matching formats will automatically appear in the Format list at the bottom of the
window, based on the previously selected parameters.
7. Click Finish.
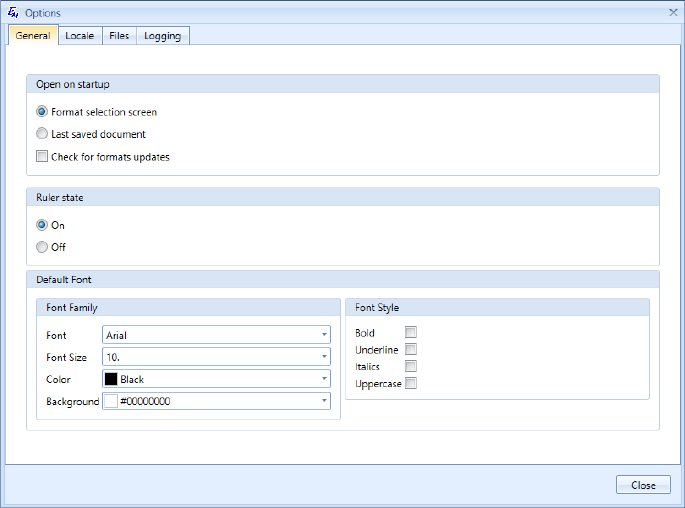
91
7. Configuring the Application
You can set up the Easy-Mark Plus™ Labeling Software in the Options window, which can be
accessed either from the Landing Page or from the User section of the File tab on the Ribbon. The
Options window has four tabs: General, Locale, Files, and Logging.
• On the General tab, you can define what should be opened when the application is
launched: either the format selection screen or the last saved document. Also, on the
General tab you can select the Show formats updates checkbox to determine whether
Easy-Mark Plus™ should look for available new formats. Finally, here you can decide
whether to show the ruler in the document view, and select the preferred fonts for your
labels.
• On the Locale tab, you can change the interface language of Easy-Mark Plus™, select the
preferred measurement unit (inches or millimeters), and define the default date format.
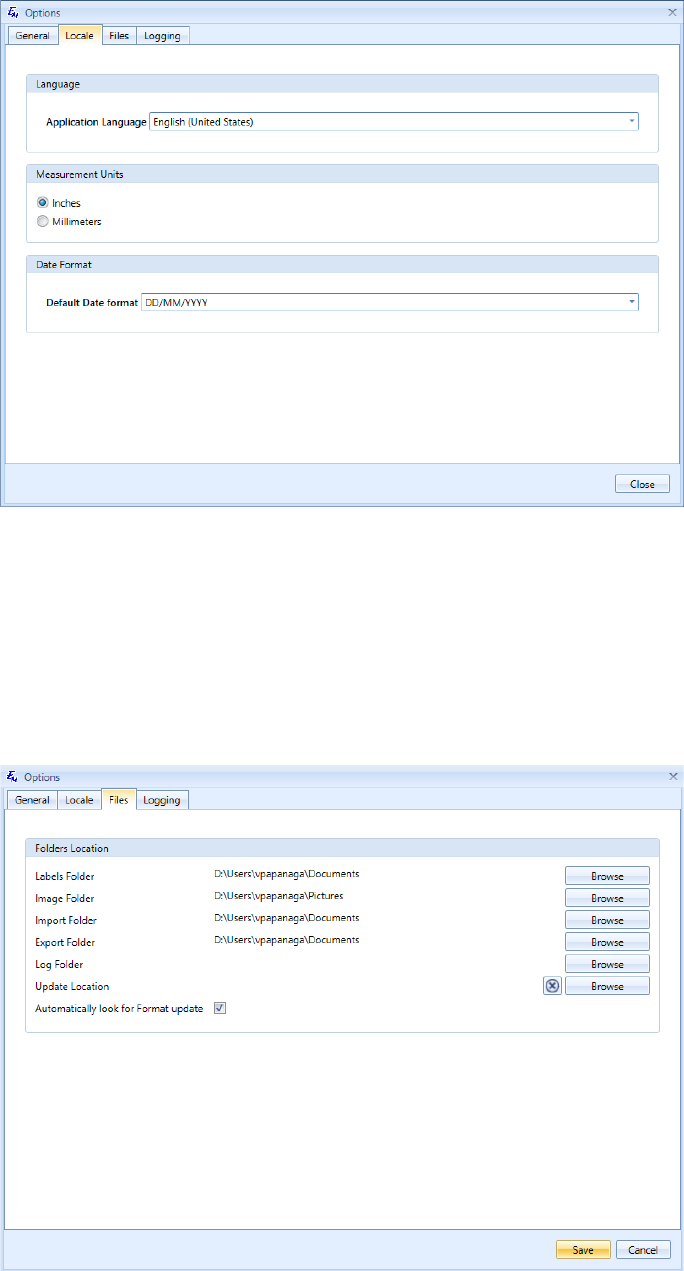
92
• On the Files tab, you can select the folders on your computer where images and labels
should be stored by default. Here you can also choose the folders for the import and export
files, log files, and format updates. Moreover, on the Files tab you can select the
Automatically look for Format update checkbox to determine whether Easy-Mark Plus™
should automatically check for new available formats..
• On the Logging tab, select the Enable Logging checkbox to turn on the logging
functionality for Easy-Mark Plus™. This will create a log file containing a list of the format
and date printed. This is useful if a record is desired of what labels have been printed and
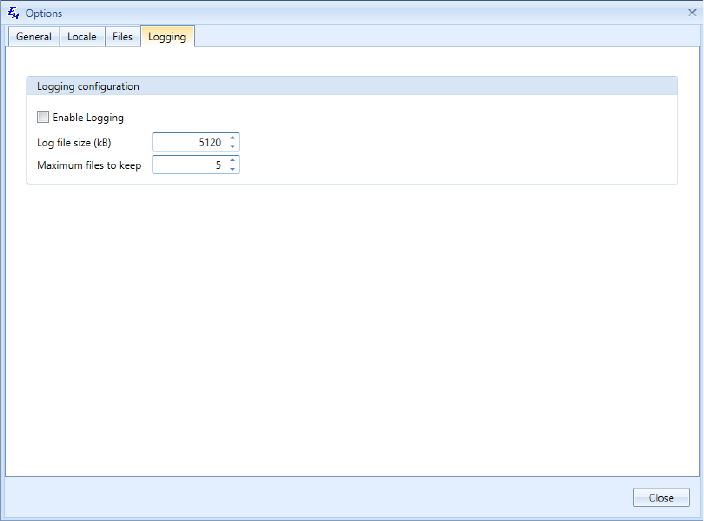
93
when they were printed. Define the maximum size of the log file in kilobytes and the
maximum number of files that should be kept in the log.

94
Troubleshooting
For more information, visit our website: www.panduit.com
For technical support, please contact us:
Region
Telephone
E-mail
USA & Canada
1-866-871-4571
GA-TechSupport@panduit.com
Latin America
+52-33-3777-6000
TechSupportLatAm@panduit.com
Europe
+31-546-580-452
emeatoolservicecenter@panduit.com
Asia Pacific
65-6379-6700
TechSupportAP@panduit.com
Japan
81-3-6863-6060
TechSupportAP@panduit.com
Australia
613-9794-9020
TechSupportAP@panduit.com
95
Index
Creating new files
adding documents to project, 31
by using wizards, 31
from the Landing Page, 30
from the Ribbon, 30
Creating Templates, 61
Edit tab
objects, 47
snapping, 48
File tab
printing files, 33
saving files, 33
File tab
protecting files, 37
Formats tab
Favorites, 66
Home tab, 15
inserting graphical objects, 39
on the Landing Page, 15
on the Ribbon, 17
printing files, 33
saving files, 33
Insert tab
inserting graphical objects, 39
prompt at print, 43
Inserting
barcodes, 45
date and time, 44
images, 41
lines, 40
rectangles, 40
tables, 42
text boxes, 39
Labels
customizing layout, 51
continuous formats, 53
label modes, 51
customizing view, 55
editing, 50
importing, 59
label modes
flag, 51
wiremarker, 18, 52
overflow, 50, 53
series, 56
templates, 61
Landing Page, 15
creating new files, 30
opening files, 32
Layout tab
two-sided printing, 36, 54
Measurement units
for formats, 26
in the Options window, 73
on the View tab, 55
Opening files
from the Landing Page, 32
from the Ribbon, 32
Options window, 73
Ribbon
creating new files, 30
Edit tab, 19
File tab, 17
Font tab, 21, 63
Formats tab, 21, 65
Home tab, 17
Insert tab, 18
Layout tab, 20
opening files, 32
overview, 17
View tab, 19
Settings window
creating media types, 29
creating printer types, 27
Settings window
creating formats, 25
Tables
editing, 49
inserting, 42
Wizards
overview, 68
safety signs, 69
